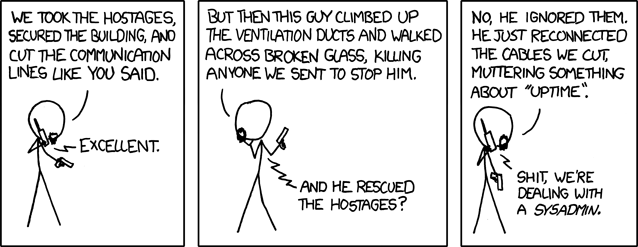
Today I Learned how to Run SQL Server on a Mac using Docker

Working on my code example for my upcoming SQL Saturday 710 talk I ran into a performance issue.  My laptop is an older MacBook Pro and I was trying to run my example on a Windows virtual machine…

What is SQL Saturday?  Good question.

SQL Saturday Logo

SQL Saturday is an entire day of talks, training, and socializing about databases and data storage.  SQL Saturday 710 is on May 5th in Edmonton but there are SQL Saturdays, with different numbers at the end, all around the world on different dates.

Back to my problem which was running my example on a Windows virtual machine running on my older MacBook Pro. I’ve upgraded my MacBook Pro over the years with more RAM and a SSD hard drive the virtual machine is still not responsive enough for my liking with SQL Server and Visual Studio running on it.  I’ll be doing some live coding and database querying and want a nice experience for the attendees.

My options were procure a Windows laptop for the presentation, dual boot my existing laptop, or see if I could run my example natively on my Mac.  I didn’t want to borrow a laptop and setting up dual boot and installing Windows, Visual Studio, etc sounded like a lot of work.

I knew I could run the website part of my example on my Mac thanks to .NET Core but what about SQL Server?  I could use a different database but wanted to stick with SQL Server because it’s the database most of the SQL Saturday attendees are familiar with.

Some Googling reviled that SQL Server can run on a Docker container and that Microsoft has a SQL Server Docker image.  I tried it an it worked.

First install Docker for MacOS which you can find here.  Once installed you should see a whale in the status menus at the top right.

Docker Running on Mac

Next open up a terminal and pull down the SQL Server Docker image.

 
$ docker pull microsoft/mssql-server-linux

Pull SQL Server Docker Image

Now run the Docker image.

 
$ docker run -e 'ACCEPT_EULA=Y' -e 'SA_PASSWORD=Password1234!' -p 1433:1433 --name SQLServerForDemo -d microsoft/mssql-server-linux:latest

Run SQL Server Docker Container

List Running Docker Images

Notice the port number and don’t forget to set the name so it’s easier to find your image.

Now you can access SQL Server via the command line but I prefer a GUI client.  Plus a GUI client would look better during the presentation.  You can’t install SQL Server Management Studio on a Mac but there other clients you can use.  My preference is DataGrip because it works well and it’s included in my JetBrains subscription.  If you use ReSharper check your subscription level and see if it’s includes DataGrip.

In DataGrip you need to add a new DataSource.

DataGrip add SQL Server Data Source

For the address you can use localhost but you need to specify the port you used when running the SQL Server Docker container.  Your password is the one you used to run the Docker image.  Also install any missing drivers if prompted.

DataGrip Setup SQL Server Data SourceNow you should be able to see your SQL Server database server in DataGrip.  You can then add new databases as needed.

DataGrip Create TestDb

Any changes you make to the database will be persisted even when you start and stop the image.

P.S. – Picked this song because Docker has a whale as it’s mascot and this video is about a whale and got a whale in the video.

And we are far from home, but we’re so happy
Far from home, all alone, but we’re so happy


Posted in Software Development, Today I Learned | Tagged , , , | Comments Off on Today I Learned how to Run SQL Server on a Mac using Docker

Chris, have you created that Ruby on Rails 5 project? What Does it Look Like I’m Doing!

In the above video you can replace the question with:

Chris, have created that Ruby on Rails 5 project?

What dose it look like I’m Doing!

Scene 1: Create new Ruby on Rails project using Ruby Mine.

New Ruby Mine Project

Scene 2: Try to install the Gems find out I need Ruby 2.5.

Bundler Error

Scene 3: Try to install Ruby 2.5 but it fails with a weird curl error message.

Curl Error Installing Ruby

Scene 4: With help from the world’s greatest detective I figure out my version of OpenSSL is out of date.  Try running updates to get the latest version.

Updating OpenSSL

Scene 5: Didn’t fix the problem.  Figure out the version of OpenSSL being used is the Centrify version.  Yes I always think the “which” command is “where”.  Why is the command called “which”?

Which OpenSSL

Scene 6: Investigate the best way to fix this problem.  Decide it’s easiest to update Centrify.

Upgrading Centrify Express Part 1

Upgrading Centrify Express Part 2

Upgrading Centrify Express Part 3

Scene 7: Problem is fixed and I can install Ruby 2.5.

Installed Ruby 2.5

I still need to install and/or update a couple other packages, such as nodejs, but that is what I expected.  I didn’t expect to have to waste an hour diagnosing an old OpenSSL issue.

Posted in Code Examples, Software Development | Tagged , , , , | Comments Off on Chris, have you created that Ruby on Rails 5 project? What Does it Look Like I’m Doing!

Today I Learned how to Run SpinRite on a UEIF Motherboard

I have a Synology NAS that has starting acting up.  By acting up I mean I can’t connect to it and it requires a unplugged reboot to fix it.  Power button no work.  After doing some detective work I’m not sure if the problem is with the hard drives or the Synology it’s self.

To help me narrow down the problem I thought I’d run SpinRite which is a hard drive diagnostic tool.  I heard about SpinRite from the Security Now podcast.  It was created by Steve Gibson, one of the hosts and they talk about it’s virtues often on the podcast.

I bought and download the application and then was bit stumped on what to do next.  The documentation on the website is dated so it took me a while to figure out how to get the software to run.  I had an especially difficult time because the software was written before UEIF motherboards where common place and my mother board has UEIF enabled.  So I documented my steps so I remember and hopefully it will help others as well.

First off I couldn’t just run SpinRite on my Synology.  I had to remove the hard drives from the Synology and connect them to a motherboard using a SATA cable.

Connect Hard Drive to SATA Cable

Once connected I needed to create bootable USB drive.  This took some trial and error because at first I just created the bootable USB using the SpinRite program and tried disabling the UEIF on my mother board.  This didn’t work.  I also tried creating a ISO image using SpinRite.  This also didn’t work.  In both cases the USB drive would not boot, just a black screen.

In summary don’t do the below screen shots.  Just ignore them.

SpinRite Home Screen

SpinRite Create Boot Disk

SpinRite Create ISO

I think the problem is the SpinRite application uses FreeDOS which does not play well with UEIF.  At least it didn’t play well with my BIOS, your mileage might vary.

What did work was creating a bootable USB stick using the Rufus program.  The settings I used are outlined below.

Rufus Create Bootable USB

Once you have the bootable USB stick copy over the SpinRite executable to the USB stick.  Then reboot your computer and make sure you boot from the USB stick.

Boot From USB

This should load MS-DOS.  Select your keyboard and then run the SpinRite program.  For you young wippersnapper DOS was the first operating system developed by Microsoft before Windows.

Run SpinRite in MS-DOS

Press any key once you are done reading the SpinRite splash screen.

SpinRite Splash Screen

Then choose 4 for maintenance.

SpinRite Levels

Then prepared to be really sad because your hard drive is 3TB and SpinRite 6 can’t handle drives larger then 2TB.

SpinRite Invalid Partition

There has been talk of SpinRite 7 which should fix this issue but for now I’m out of luck.

So this is really a BOGO Today I Learned.  Not only did I learn how to run SpinRite on a modern BIOS but I also learned that it can’t handle drive sizes larger then 2TB.

Sorry for the surprise and somewhat sad ending.


P.S. – A Boy Named Sue is great song with a surprise ending.  Not necessarily sad but still surprising.

P.S.S. – I just learned that this song was written by Shel Silverstein.  You know, that scary guy at the back of your favourite children’s book.

And I think about him, now and then,
Every time I try and every time I win,
And if I ever have a son, I think I’m gonna name him…


Posted in Hardware, Software Development, Today I Learned | Tagged , , | Comments Off on Today I Learned how to Run SpinRite on a UEIF Motherboard

Just Enjoy the Show

I’m on optimist and generally think things will work out for the best.  I like to say:

The future is awesome!

That said it’s easy to forget how awesome individual days can be.  How many small but amazing things occur each day that we gloss over.  Our day is 99% good and 1% bad but we focus on that one minor bad moment.

Think about your conversations at the end of the day.  Does it focus on the negatives of the day?  That boozo that cut me off in traffic.  The Internet was down for 5 minutes.  I had to stay at work 10 minutes late.  Etc.

Imagine changing the conversation to focus on all the good things that happened that day.  The person that let me merge into their lane.  Technology let send a e-mail to relative half-way around the world.  I solved several work problems with the help of my co-workers.  Etc.

My inspiration for this post was the last Burnie Vlog at Rooster Teeth.  It is a, heavily edited, example of his day.  It does a great job of showing how a normal day is full of awesomeness.  Awesomeness that we often take for granted.  At least that is what I got out of it.

The Vlog caused me reflect on my last Friday.  A day that contained many awesome moments that I didn’t fully appreciate at the time:

  • Woke up a bit late because I had a remote work meeting late the night before people from the United States and India.
  • Still got up in time to make my family breakfast and see them off.
  • Cleaned myself up.
  • OfficeNo commute because I’m lucky enough to work from my basement office.
  • Had remote meeting with co-workers in Eastern Canada and States.  Great group to work with.
  • Worked on my first official code inspection.  I’ve done code reviews and informal code inspections but not a structured official one.  I’m really excited.
  • Watched the end of Altered Carbon on my couch while eating lunch.
  • Went for a walk because it was nice winter day in Edmonton.
  • Greeted my amazing daughter and beautiful wife when they got home from school and work.
  • DreamcastHad some time before dinner so my daughter and I packed up board games, old TV, and Dreamcast in the car.  I have Tony Hawk Pro Skater for the Dreamcast.
  • Ate dinner with my family.  Talked about what live would be like if could move our conscious to other bodies like in Altered Carbon.
  • Drove to the local community hall and setup for the monthly Games Night.  I bring a bunch of board games and setup a TV with a an old video game console.  This night was Dreamcast but previous months it’s been NES, Super NES, Intellivision, etc.
  • Played a new game Terraforming Mars.
  • BoardgamesVisited with friends and neighbours.  Sang happy birthday to a neighbour and ate cake.  My beautiful wife dropped in for a bit as well which always makes me smile.
  • Watched my daughter teach and play Zombicide and The Dragon and Flagon.  Still not used to seeing my daughter and her friends play complicated games without adults.
  • Packed up a bit earlier then usual (i.e. before midnight) but for a good reason: we are going skiing the next day with friends.  Just to a local Edmonton hill but it’s to practice for our upcoming mountain ski trip.
  • Sent my daughter to bed then snuggled up with my wife and drifted off to sleep.

All in all it was great day.  Preceded by many great days before it and many great days to come.  Just enjoy the show and don’t ask for your money back.  Also, the future is awesome.


P.S. – After watching the Final Vlog video above I had The Show song stuck in my head and kept singing it much to my family’s chagrin.  At least singing the couple lines I knew.  Below is the cover sung in the Final Vlog.

I’m just a little bit caught in the middle
Life is a maze and love is a riddle
I don’t know where to go; can’t do it alone; I’ve tried
And I don’t know why

I want my money back
Just enjoy the show

Posted in Fun | Tagged , , , | Comments Off on Just Enjoy the Show

Today I Learned how to Copy a Putty Key From Windows to a Mac

You created a private Putty key on Windows workstation to access a remote service but now you need to access that same remote service from a Mac workstation.  In my case I need to access the same Git repository from both machines.  I created the key using the steps outlined in a previous post.

Quick aside: Before we continue you need to decide if it’s better to copy your private key or just generate a new private/public key pair on the Mac.  If the service you are connecting too does not support multiple keys then you have now choice but to copy it.  Assuming that the service does allow multiple keys then consider these security implications of copying your private key.

The first thing to do is convert the key from a Putty key to a OpenSSH key.  Do this by opening the key in PuTTYGen then choosing File –> Load private key.  Then pick the key you want to transfer to your Mac.

Load Existing Key

Select Key to Load

Key Loaded

Now convert the key to OpenSSH via the Conversions –> Export OpenSSH Key menu option.

Export SSH Key

Saving Open SSH Key

Now that the OpenSSH key is saved copy it over to your Mac.  Since this is a private key do it securely such as known LAN, USB, etc (e-mail is a bad idea).  Once the key is on your Mac copy it to the .ssh folder.

Copy Key to .ssh Folder

Then run the command to add the key.  Use the capital -K option to add the key to the Mac KeyChain so you don’t have to keep entering your passphrase.  The first password prompt is the Sudo password and the second is the passphrase for the private key.

sudo ssh-add -K <key file>

Add Key to Keychain

Now you can see that the key has been added by running the following command.

sudo ssh-add -l

Show Added Key

You can also find the key in the Mac Keychain.  In the Keychain application filter by SSH and you should see your key added.

Key in Keychain


Now your private key has been successfully copied.


P.S. – Another key blog post and another Tool song because, you know, numbers.  This one is about the Fibonacci sequence.

And following our will and wind
We may just go where no one’s been.
We’ll ride the spiral to the end
And may just go where no one’s been.

https://www.youtube.com/watch?v=wS7CZIJVxFY

Posted in Network, Today I Learned | Tagged , , | Comments Off on Today I Learned how to Copy a Putty Key From Windows to a Mac

Today I Learned How to Create a Key Pair Using PuTTY

I recently had to generate a private/public key pair to access a Git repository.  While I’ve done this several times before I never do it enough to remember all the steps so this time I wrote it down.

Since my primary workstation runs Windows I use PuTTY to generate the keys.  If you thought PuTTY was just a SSH client then you are not alone (e.g. I used to think that too).  PuTTY’s unofficial tag line should be:

PuTTY.  It’s more then a just a SSH client.

Once you have Putty installed run the PuTTYGen application.  Make sure the type of key to generate is RSA and it’s 2048 bits then click the Generate button.

Why RSA?  Because that is the type of key you want 99% of the time and works with most clients and services.  Same with the 2048 length.  You can generate a longer key, say 4096 for better security, but it might not work with some clients and/or services.  That said if your service uses a different key format then adjust the settings as needed.

PuTTYGen Empty Form

Wiggle your mouse when prompted and a few seconds later you should have a new key generated.

Now change the key comment so you remember what this key is for.  I also recommend protecting you key with a passpharse, basically a password.  This prevents someone from using your private key if they are able to get a hold of it.  Then click Save private key button and save the key to a secure place.

PuTTYGen Save Private Key

PuTTYGen Save Private Key Prompt

Remember this is your private key and if someone gets a hold of it they can pretend to be you.  Similar to someone knowing your password.  In my case I save it to an encrypted location.

You should also backup your new key to a secure location.  In my case my keys are backed up to an encrypted location as part of my nightly backup.

Most remote services, such as GitHub, will ask you for your public key which you can cut and paste.

PuTTYGen Public Key

GitHub Adding Public Key

Important: When using your key remember to only share the public part.  Never share your private key!

Now you are all excited to start using the service you uploaded your public key, such as cloning the Git repository.  Unfortunately you will get an error about the key not being valid, not found, or something similar.

On Windows you need to run the PuTTY Pageant application.  This application runs in the background and handles key authentication.  When you run it it will load in the windows Notification Area (on the far right, used to be called the System Tray).

Pageant In Notification Area

Open up Pageant and then click the Add Key button.  Then navigate to where your private key is stored and load it.

Pageant Add Key

Pageant Add Key Prompt

If you put a passpharse on your key, which you should do, you will get prompted for it.

Pageant Password Prompt

Now your key will appear in Pageant and be used by applications that need to do key authentication.  You won’t have to enter your passpharse again while Pageant is running.  In practice this means you usually only have to reenter your passphrase when you reboot your computer.

Pageant Key Added


That is all there is too it.  Enjoy using your new key pair.


P.S. – I couldn’t find any good songs about keys but keys are encryption and encryption is complicated math.  Tool is known for songs with unique time signatures (i.e. hard music math) in their songs.  Schism is an excellent example of this with a 6 1/2 over 8 time signature.

I’ve done the math enough to know the dangers of our second guessing
Doomed to crumble unless we grow, and strengthen our communication

https://www.youtube.com/watch?v=_yNAABKD4IA

Posted in Software Development, Today I Learned | Tagged , , | Comments Off on Today I Learned How to Create a Key Pair Using PuTTY

Today I Learned how to Install PostgreSQL in Ubuntu

For an upcoming project I’m thinking of using PostgreSQL.  I’ve heard lots of great things about PostgreSQL in the past but have been too scared lazy busy to try it.

What changed my mind was JetBrains DataGrip database client.  I’m sure there are other PostgreSQL clients but DataGrip is included in my JetBrains subscription so why not give it a try.   I’m a sucker for GUI database clients.  As a generalist it’s too hard to remember all the command lines for each individual database.  Plus it’s really hard to view more then a few rows or columns of data in the command line.

Anyway, let’s get to installing Postgresql in a Ubuntu development environment.  The initial installation instructions can be found here.  First lets add the PostgreSQL Apt Repository.  We do this so we can get he latest version of PostgreSQL and aren’t stuck with the Ubuntu version.

First create a file that will point to the PostgreSQL Apt Repository:

sudo nano /etc/apt/sources.list.d/pgdg.list

Then add the following to the file:

deb http://apt.postgresql.org/pub/repos/apt/ -pgdg main

Finally import the repository signing key:

wget --quiet -O - https://www.postgresql.org/media/keys/ACCC4CF8.asc | sudo apt-key add -

Now do a apt update and you should see the PostgreSQL listed:

sudo apt update

Finally install it:

sudo apt install postgresql

You can check if PostgreSQL was installed correctly by trying to connect to it:

sudo su - postgres psql

Notice you had to switch to the postgres user before attempting to connect.  This is a new user that was created during the PostgreSQL installation and is the default user for new database installs.

By default PostgreSQL does not have a default password in Ubuntu.  You can only login via the above command and can’t connect using other methods, such as DataGrip.  To change the postgres default user password run the following command when logged into PostgreSQL:

ALTER USER postgres PASSWORD 'password';

Once that is done you can logout of PostgreSQL by typing “\q”.

Now lets try to connect to our localhost PostgreSQL install in DataGrip.  Run DataGrip then choose File–>Data Sources.  Then click PostgresSQL and you should see something similar to the below.

DataGrip PostgreSQL Data Source

DataGrip PostgreSQL Data Source Advanced Options

If prompted download the driver files.  Now lets try to create a connection by clicking the green plus sign in the top right and choosing PostgreSQL:

DataGrip PostgreSQL Create Datasource Menu

You should see something similar to the below:

DataGrip PostgreSQL Create Datasource Download Missing Drivers

If there is a message saying a driver is missing then download it.  If this is your first time installing PostgreSQL there will be no database so leave that field blank but fill in the username and password.  The username is “postgres” and the password if the one you created in the above ALTER statement.  Click Test Connection to make sure everything works.

Test Database Connection

When you close this form you might be prompted to store the password in your keyring.  You don’t have to but I like too so I don’t have to keep entering it.

Key Chain Prompt

Now you should be able to see the PostgreSQL database in DataGrip:

PostgreSQL Database in DataGrip


P.S. – Spotify listed Bored to Death by Blink 182 as my most played song of 2017.  The second most played song was Sober also by Blink 182.  I wonder what targeted ads I would get if that information feel into Google or Facebook’s hands.

Life is too short to last long

Posted in Code Examples, Software Development, Today I Learned | Tagged , , | Comments Off on Today I Learned how to Install PostgreSQL in Ubuntu

Blast from the Past: New Tools Require New Standards

I recently started a new contract that involves tools and software languages I normally don’t use.   I have to remember that .NET best practices don’t necessarily translate to PHP/Java.  I have to remember that New Tools Require New Standards (originally published on September 3rd, 2010).


“An old belief is like an old shoe.  We so value its comfort that we fail to notice the hole in it.”
Robert Brault

As developers we all have standards, even if they aren’t that well defined.  Of course I’m talking about technology standards but feel free to insert your social awareness and/or hygiene standard joke here.  Standards can range from the usual coding standards to the names you give your servers (e.g Lord of the Rings Characters) and everything in-between.

Having been a developer for one third of my life, I’ve developed quite a few standards of my own.  Having worked in Windows shops most of my career, most my standards are focused around those tools.

Ruby on RailsWhen I first tried Ruby on Rails, I was prepared for a new website architecture (e.g. MVC).  What I wasn’t prepared for was adopting the new coding standards that Ruby encouraged.  With my brain already overloaded with the new architecture, I found myself writing Ruby code as though it was C# code.  The biggest one I noticed was naming my database tables and fields in camel case format instead of the underscore format that Rails encouraged.

I know this sounds stupid now, but at the time, my poor overloaded brain wanted to keep using the camel case names even though the tool, Rails, didn’t encourage it.  I even went as far as to look up how to override the underscore names before I came to my senses.

Crushing your HeadIt’s easy to forget but the main reason for having standards is to “compensate for the strictly limited size of our skulls”.  As Steve McConnell says:

“The primary benefit of a coding standard is that it reduces the complexity burden associated with revisiting formatting, documentation, and naming decisions with every line of code you write. When you standardize such decisions, you free up mental resources that can be focused on more challenging aspects of the programming problem.”

Often standards arise  from the tools being used.  All tools come with their own standards from the creators and community at large.  In some cases, a standard is created to work around a limitation of the tools being used.  Just remember that when you switch to a new tool, such as when I tried Ruby on Rails, the old standards might not be applicable anymore.  Let me repeat that for emphasis:

When you switch tools, your existing standards will have to change.

This is a rule I am struggling to remember and I’ve only been a developer for one third of my life.  Now imagine you have been a developer for over half your life.  How hard is it to give up on your well worn standards when faced with a new tool?  Very hard, I think, based on this summarized experience I recently had:

  • Start developing application using Fluent NHibernate as it will be the company’s new standard.
  • Well into development, find out the company’s existing standards require all database access to go through stored procedures.  Brought to our attention by a tech lead who had been a DBA for over half his life.
  • Have several meetings and e-mails about the impact of re-writing the code to meet the standard and how the tool NHibernate doesn’t work well with their existing stored procedures standard.
  • The tech lead relents and allows us to use NHibernate as it was designed.

There is a much longer story but the important part is the tech lead realized that if you are adopting a new tool at your company, your existing standards will have to change.  Remember that the standards he had helped reduce his mental load.  Being a technical lead is enough work without having to learn a new set of standards.

My hope is that after I’ve been a developer half my life, I remember my own rule and am willing to adapt my entrenched standards to a new tool despite the pain it might cause my brain.

Posted in Blast from the Past, Software Development | Tagged , , , | Comments Off on Blast from the Past: New Tools Require New Standards

Introduction to Object-Relational Mapping for DBAs – Part 3

Why Developers Use ORMs (i.e. their Strengths)

This is the third and final part of a lighting talk I’m giving at the SQL Saturday Edmonton Speaker Idol Contest.   Imagine I’m actually speaking the words below and showing some of the images on slides and/or doing a demo.

If you don’t want to read Part 1 or Part 2 the basically give an example of a developer using ORM, panic over indexes, and then show more ORM examples.  I don’t think it will all fit in a 15 minute talk.

This is a rough draft so constructive feedback at chris.cumming@saturdaymp.com is much appreciated.

The first obvious reason developers use a ORM is it lets them create an application knowing little to no SQL.  A developer without SQL training can use the ORM to help them generate the database and write queries for them.  The DDL and SQL queries created by the ORM is probably just as good or better then what a novice SQL developer could write.

ORMs also write a lot of the repetitive SQL for the developer.  You know, the SQL for find a certain piece of data like a user or inventory item.  The SQL to update that piece of data or create it if it does not exist.  The boring repetitive CRUD SQL statements.  Without an ORM developers used to have write ADO.NET code which looked like:

using (SqlConnection conn = new SqlConnection(connString))
{
  // Query to load all the information about a customer.
  // province.  Hopefully there are no typos in the SQL.
  // Use parameters so we don't have
  // SQL injection issues.
  var cmd = new SqlCommand("
    Select c.*, a.*, p.Abbreviation
    From Customers c 
    Inner Join on Addresses a
    Inner Join on Provinces p
    Where c.Id = @CustomerId"
    And a.AddressType = @HomeAddressType
  ); 
  cmd.Parameters.AddWithValue("@CustomerId", customerId);
  cmd.Parameters.AddWithValue("@HomeAddressType", HOME_ADDRESS_TYPE);

  // The adapter to read the data from the database.
  var dataAdapater = new SqlDataAdapter(cmd, conn);
  
  // The dataset to fill with data.
  // I think in .NET Core 2 you can create a DataTable
  // instead of always using a DataSet.  If true that would
  // have been great 20 years ago.
  var dataSet = new DataSet();
  dataSet.Tables.Add();

  // Read the data and fill the dataset.
  dataAdapter.Fill(dataset.Tables[0]);
} // Connection to database is closed.

// Show the data in the type unsafe dataset. Hope 
// you don't have a typo in the column names and 
// you correctly handle database nulls (not shown). 
Console.WriteLine{$"Name: {drow["Name"]} 
  Street: {drow["StreetAddress"]} 
  City: {drow["City"]} 
  Province: {drow["Abbreviation"]});

Actually, I’ll tell you DBAs a secret.  Back in the ADO.NET days no developer ever wrote all the code in the first example.  Instead we usually created our own custom code library that handled all the work to fill a DataSet with data.  The problem is every development shop had it’s own custom data access library with their own features and/or bugs.  But still, it was ugly code to write and would often break if the underlying database changed even a bit.

Using Entity Framework, Microsoft’s ORM, the above code looks like:

using (var ctx = new MyDbContext)
{
  // No need to worry about typos.  If Customers
  // is misspelled then a compile error will occur.
  // Also no need to worry about SQL injection.
  var customerToView = ctx.Customers
    .Include(customer => customer.Address)
    .ThenInclude(address => address.Province)
    .Where(customer => customer.Id.Equals("Id"))
    .ToList();
} // Connection to database is closed.

Console.WriteLine($"Name: {customerToView.Name} 
  Street: {customerToView.Address.StreetAddress} 
  City: {customerToView.Address.City} 
  Province: {customerToView.Address.Province.Abbreviation}); 

Wow, that is a lot less code and much easier to read.  The developer still needs to understand a bit of the underlying database structure but a lot of the grunt work is taken care of.

Finally the biggest strength of a ORM is abstraction of data access.  It lets developers focus on the business logic and GUI of the application.  Data access is this magic thing that just happens.

Actually that’s not 100% true.  Like all abstractions ORMs leak so the developer has to know something about the underlying database but for those brief few moments the developer has one less thing to think about.  As Sherlock Holmes put it so eloquently said about developers:

“I consider that a man’s developer’s brain originally is like a little empty attic, and you have to stock it with such furniture as you choose. A fool takes in all the lumber of every sort that he comes across, so that the knowledge which might be useful to him gets crowded out, or at best is jumbled up with a lot of other things, so that he has a difficulty in laying his hands upon it. Now the skillful workman developer is very careful indeed as to what he takes into his brain-attic. He will have nothing but the tools which may help him in doing his work, but of these he has a large assortment, and all in the most perfect order. It is a mistake to think that this little room has elastic walls and can distend to any extent. Depend upon it, there comes a time when for any addition of knowledge, you forget something, that you knew before. It is of the highest importance, therefore, not to have useless facts elbowing out the useful ones.”

“But the Solar System Database!” [Watson] I protested.

“What the deuce is it to me?” he interrupted impatiently:  “you say that we go around the sun store data in a database.   If we went round the moon stored the data on a stone tablet it would not make a pennyworth of difference to me or to my work”.

Good developers are good at using abstractions.  They create abstractions in code through functions, classes. and layers such as the GUI layer, business layer, etc.  An abstraction lets them to temporarily “forget” about the rest of the application and focus on the part they are working on.

Why DBAs Dislike ORMs (i.e. their Weaknesses)

Not only do good developers lover abstractions but they also understand their weaknesses.  Bad developers don’t understand that abstractions can have weaknesses.  Remember Uncle Ben’s famous words:

With great power abstractions comes great responsibility.

The most common mistake beginner ORM developers make is too turn on lazy loading and then do a loop.  The famous n+1 select problem.

using (var ctx = new MyDbContext)
  // Load all the customers
  // Select * From Customers;
  customers = ctx.Customers.ToList();

  // Print each customers city.
  foreach (var customer in customers)
  {
    Console.Writeline(customer.Name);

    // Select * From Addresses where CustomerId = ?
    Console.Writeline(customer.Address.City);
  }
}

The above code will send one query to get all the customers then send a separate query to get the address information.  If would look like:

Select * From Customers;

Select * From Address Where CustomerId = 1
Select * From Address Where CustomerId = 2
Select * From Address Where CustomerId = 3
Select * From Address Where CustomerId = 4
Select * From Address Where CustomerId = 5
...

This works great in test when there are only a couple of records but grinds to a halt in production.  Any DBAs seen something similar?

Bad, or I guess naive is better word, developers like lazy loading because the data just “magically” appears.  Good developers turn off lazy loading and write their code to only send one query.

using (var ctx = new MyDbContext)
{
  // Get all the customers and their addresses
  // in one query.
  // Select * From Customers c
  // Inner Join Addresses a On c.Id = a.CustomerId
  var customers = ctx.Customers
    .Include(customer => customer.Address)
    .ToList();
}

// Print each customers city.
foreach (var customer in customers) {
  Console.Writeline(customer.Name);

  // No query, data is already in memory.
  Console.Writeline(customer.Address.City);
}

Another common mistake when using ORMs is pulling back unnecessary data.  In the above example we only want the customer name and city but the generated query pulls back all the customer and address columns.  ORMs are great when you need all or most of the columns in a table but are not as useful when you only need one or two columns.

We can re-write the above to only bring back the columns we are interested in:

using (var ctx = new MyDbContext)
{
  // Get all the customers and their addresses
  // in one query.
  // Select c.Name, a.City From Customers c
  // Inner Join Addresses a On c.Id = a.CustomerId
  var customerCities = ctx.Customers
    .Include(customer => customer.Address)
    .Select(c => c.Name, c.Address.City)
    .ToList();
}

// Print each customers city.  Notice the
// data is flattened.
foreach (var custCity in customerCities ) {
 Console.Writeline(customer.Name);
 Console.Writeline(custCity.City);
}

Another big weakness of ORMs is complex queries.  ORMs really don’t handle joining lots of tables together or trying to have a complicated where and/or grouping.  These are best handled by writing SQL.  Needless to say reports should never use an ORM.  Instead use SQL or better yet a tool that helps you create reports.

The final weakness of ORMs is they don’t work well with stored procedures and views.  This can really be a problem is you are a DBA that likes all data access to go through views or stored procedures.  ORMs can also be a problem if you us a lot functions but that is usually less of an issue.

It’s not that ORMs can’t handle views or stored procedures it’s just not their strength.  The ORM abstraction works best if tables can be mapped to classes and fields to properties.  I once saw a project that used an ORM but had to access all the data via stored procedures and it was not pretty.  It was like the data access code fell from the top of the ugly tree and hit every branch on the way down.

How DBAs and ORMs can Work Together

I recently heard a good quote from the Supergirl TV show which I think is appropriate:

GIF Team Work Makes the Dream Work

The quote probably didn’t originate from Supergirl but you get the idea.  Good teams have empathy for each other and hopefully this talk has increased your empathy for developers by showing you why they use ORMs.

Hopefully developers have empathy for you as well.  A good developer respects that the DBA is the guardian of the data.  It’s your job to make sure the data is accurate and readily available.  Developers often focus on how their application uses the data and forgets other applications might have different data access requirements.

Assuming you are working with a good developer keep the following in mind:

  1. Let the ORM generate schema changes but make sure to review them.  The developer might not realize that renaming the column caused the column to be dropped and recreated resulting in data loss.
  2. Let the ORM access the tables directly.  Only force access threw a  view or stored procedure if there is a good reason.
  3. Don’t be afraid to adapt the ORM’s naming schema.  An ORM will often assume things like ID is the primary key column, table names are plural, foreign keys are <tablename>ID, etc.  If you can’t adopt the ORM’s preferred naming scheme then at least be consistent in your naming.
  4. Don’t worry about being made redundant.  ORMs can do some of the work DBAs used to do but not all of it and as we pointed out above ORM generated SQL should still be reviewed.  Also ORMs can’t do the A part of DBA (i.e. they don’t backup your database, secure it, create RAID arrays, etc).
  5. If you work with bad developers try to educate them.  They might just be naive.  If you can’t educate the developers and management won’t help you don’t be afraid to move on.  Life is too short to…<fill in the blank>.

Remember “Teamwork makes the dream work”.

Now that all three parts are written it looks longer then 15 minutes.  To find out what gets cut, changed, and added you will need to attend the  SQL Saturday Edmonton Speaker Idol Contest.  Or just wait till I post the slides online.

As I said above, this is a rough draft so constructive feedback at chris.cumming@saturdaymp.com is much appreciated.  Thank you.

Posted in Code Examples, Software Development | Tagged , , | Comments Off on Introduction to Object-Relational Mapping for DBAs – Part 3

Introduction to Object-Relational Mapping for DBAs – Part 2

This is part two of a lighting talk I’m giving at the SQL Saturday Edmonton Speaker Idol Contest.   Imagine I’m actually speaking the words below and showing some of the images on slides and/or doing a demo.  Code can be found here.

If you don’t want to read Part 1 it basically started the ORM example and ended in a panic over indexes.  

This is a rough draft so constructive feedback at chris.cumming@saturdaymp.com is much appreciated.

Now that we have our initial panic out of our system lets get back to Bud.  The next thing he wants to do is link a logged in user to a player.  A player needs to have a name and be linked to the login.  Bud creates a model, really just a simple C# class, and puts in all the information he wants to store a player.

Player Model

Looks kind of like a database table.  The one question you might have is what is a ApplicationUser?  It turns out a ApplicationUser is another model in the project that was auto-created when we choose to have authentication in our application.  It’s the logged in user.

If we open that ApplicationUser class we see it does not define any fields.  It doesn’t define any fields in the child class but the parent class does.  I’m not going to explain inheritance here but rest assured the fields are defined as shown below.

Empty Application User Model

Application Model Parent With Fields

Because the relationship is one-to-one Bud does add a new property to the ApplicationUser model.

Application User Model Linked To Player

Now the application knows that ApplicationUser has a one-to-one relationship to Player.  One other thing Bud has to do is add his new class the DB context.  Entity Framework might find his new model but it’s best if it’s listed.

Player Model Added to DB Context

Now Bud can create a new migration for his new Player model.

Add-Migration CreatePlayerTable


Add Player Table Migration

This creates the <timestamp>_CreatePlayerTable file.  If we open it up we see it creates the Player table and also a foreign key relationship to the ApplicationUser which maps to the AspNetUsers table.

Player Migration Create Table

Player Migration Foreign Key To Application User

Now that the migration file is created Bud runs the migration to add the Players table to his database.

Update-Database


Update Database Add Player Table

Now if we look in the database we find the new Players table, notice it’s plural, and it has a foreign key to the AspNetUsers table.

Players Table In SQL Server

OK, enough of following Bud, we are running out of lightning time.  Lets talk about why Bud would want to use an ORM tool such as Entity Framework.

You can find part 1 here. and part 3 here.  You can find the code for this talk here.  As I said above, this is a rough draft so constructive feedback at chris.cumming@saturdaymp.com is much appreciated.


Posted in Code Examples, Software Development | Tagged , , , , | Comments Off on Introduction to Object-Relational Mapping for DBAs – Part 2