NUnit has has built in constraints for most the tests you will need to write so there is no need to create your own. End of blog post.
OK, that was a bad joke. The first step in creating a NUnit custom constraint is to read the documentation. That’s it. End of blog post.
Not as funny as the first time? Not funny at all? I won’t use that joke again. But you did read the documentation right? OK, good.
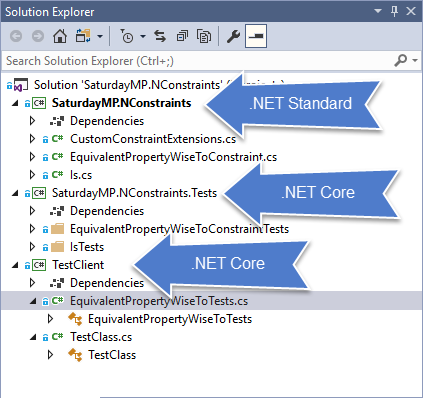
The example for this blog post is from the NConstraint project. It shows how I created a custom constraint to compare the property values or two objects. In my case I wanted to write something like:
var expected = new MyClass() { SomeProperty = 1};

// Property values match.
var actual = new MyClass() { SomeProperty = 1 };
Assert.That(expected, Is.EquivalentPropertyWiseTo(actual));

// Property values don't match.
actual.SomeProperty = 2
Assert.That(expected, Is.Not.EquivalentPropertyWiseTo(actual));
Lets start. First you need to override the Constraint class.
public class EquivalentPropertyWiseToConstraint : Constraint
{
}
Then create a constructor that accepts the expected value for the test. In our case it’s the object you want to compare but it could be anything.
public EquivalentPropertyWiseToConstraint(object expected)
{
  Expected = expected;
}

public object Expected { get; }
Notice that we save the expected object. In my case I saved it to a public property for unit testing purposes but it could be a private variable. I know, unit testing a new unit test constraint, very meta.
The next thing we have to implement is the logic for the constraint by overriding the ApplyTo method.
public override ConstraintResult ApplyTo<TActual>(TActual actual)
{
}
This method takes a the actual value from the test that you want to compare to the expected. It returns a ConstraintResult contains a reference to the constraint, the actual value, and if the constraint passed or not.
Add whatever logic you need to to the ApplyTo method. In my case I wrote some logic that loops through all the properties of both objects and compares the values. It’s a bit long so I won’t include it in this blog post. In general your method will look something like:
public override ConstraintResult ApplyTo<TActual>(TActual actual)
{
  // You code to do the comparison.

  // If the comparison succeeds.
  return new ConstraintResult(this, actual, true);

  // If the comparison fails.
  return new ConstraintResult(this, actual, false);
}
Now you should be able to run your tests by instanciating your constraint or using the Matches syntax.
// Instantiate the constraint.
Assert.That(expected, new EquivalentPropertyWiseToConstraint(actual));

// Matches syntax.
Assert.That(expected, Is.Not.Matches(new EquivalentPropertyWiseToConstraint(actual)));
One thing you might notice is the error message is not very descriptive if the test fails.
Expected:
But was: 1
The “But was” part is the actual value you passed into the constraint. In my case I passed in the property value, which was an integer, hence the 1. Your actual value might be different.
To get a better expected message you need to set the description value in the Constraint class. If you have a simple test you could hard code the description. For example the built in TrueConstraint always sets the description to “True” in the constructor.
public TrueConstraint()
{
  Description = "True";
}
In my case I needed to set the description in the ApplyTo method. For example if a property does not exist then we set a different description then if the property values don’t match.
// Property does not exist message.
Description = $"expected property {expectedProperty.Name} does not exist.";

// Property values don't match message
Description = $"property {expectedProperty.Name} value to be {expectedValue}";
Once I set the descriptions my test failed messages looked better:
Expected: property IntegerProperty value to be 2
But was: 1
You can find the entire EquivalentPropertyWiseToConstraint class and example test client at the NConstraint project.
Now your custom constraint is complete but you might notice is that you can’t use the NUnit built in “Is” syntax. For example, you currently can’t write:
Assert.That(expected, Is.EquivalentPropertyWiseTo(actual));
I’ll cover how to do this in a future post. End of blog post. No joke, this is really the end. Unless you count the P.S. video.
P.S. – R.I.P. Gord Downie. I had trouble picking my favourite Tragically Hip song but I think Bobcaygeon will do. Read more about the lyrics and their meaning here.
So I’m at your house this morning
Just a little after nine
‘Cause it was in Bobcaygeon, where I saw the constellations
Reveal themselves one star at a time