Today I Learned How to Automate Objective-c Builds in TeamCity

Several months ago I discussed how to manually build an objective-c project so it can be consumed by a Xamarin Binding Project.  In this post I show how to automate the building of the objective-c project.  In my case I need to automate the building of the BEMCheckBox project but hopefully you can generalize this specific example for your own needs.

For this post I’ll assume you have a TeamCity server setup along with a TeamCity build agent on a Mac.  For help installing a TeamCity server see the official documentation.  For help installing a Mac build agent please see my previous post and/or the official documentation.

Create the Project and Build in TeamCity

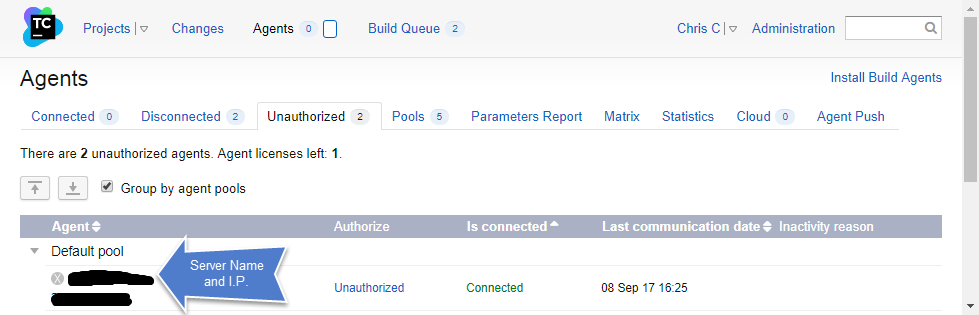
In my TeamCity setup I have a  Plugins project and under that a Native Libraries project.  Then under that I created the BEMCheckBox build as shown in the screen shot below.

BEMCheckBox Project Layout

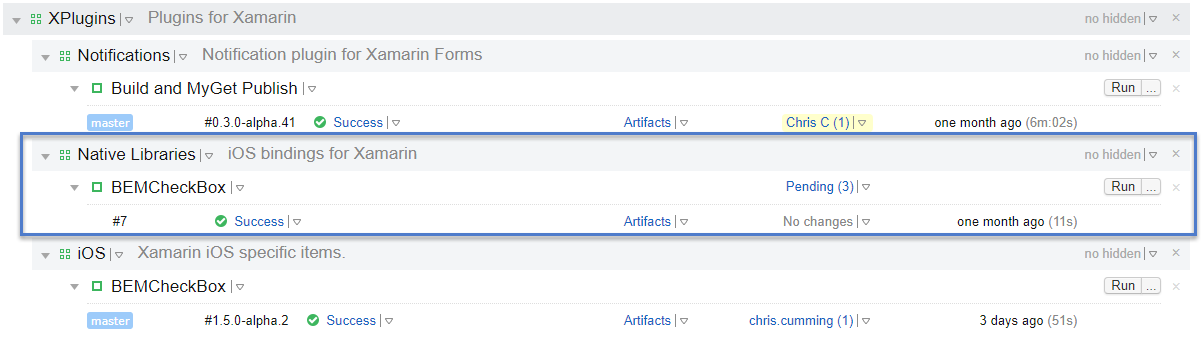
As you can see above the build already exists but I’ll walk through creating it from scratch.  First choose the project you want the build to be in and choose Edit.

TeamCity Edit Project

On this screen choose Create build configuration.  In the screen shot below I already have a build but you might not have any builds yet.

TeamCity Create Build

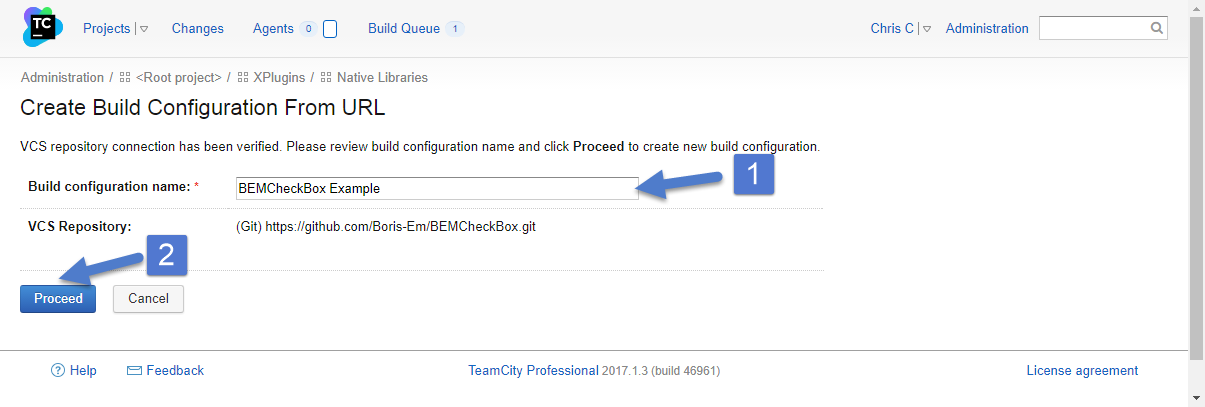
The BEMCheckBox exists on GitHub but not under my GitHub account so I have to link to the URL manually.  Copy the link to the BEMCheckBox in step 3.

TeamCity Create Build From Url

Then set the name for your build.

TeamCity Set Build Config Name

Next I setup the build steps.  TeamCity might try to figure out the default build steps but you can ignore them and setup your own.

TeamCity Configure Build Steps Manually

Build Steps

We will need to compile the BEMCheckBox twice.  Once to build for the ARM architectures and once for the i386 architectures.  The ARM architecture lets the checkbox run on physical devices and  i386 for simulators.

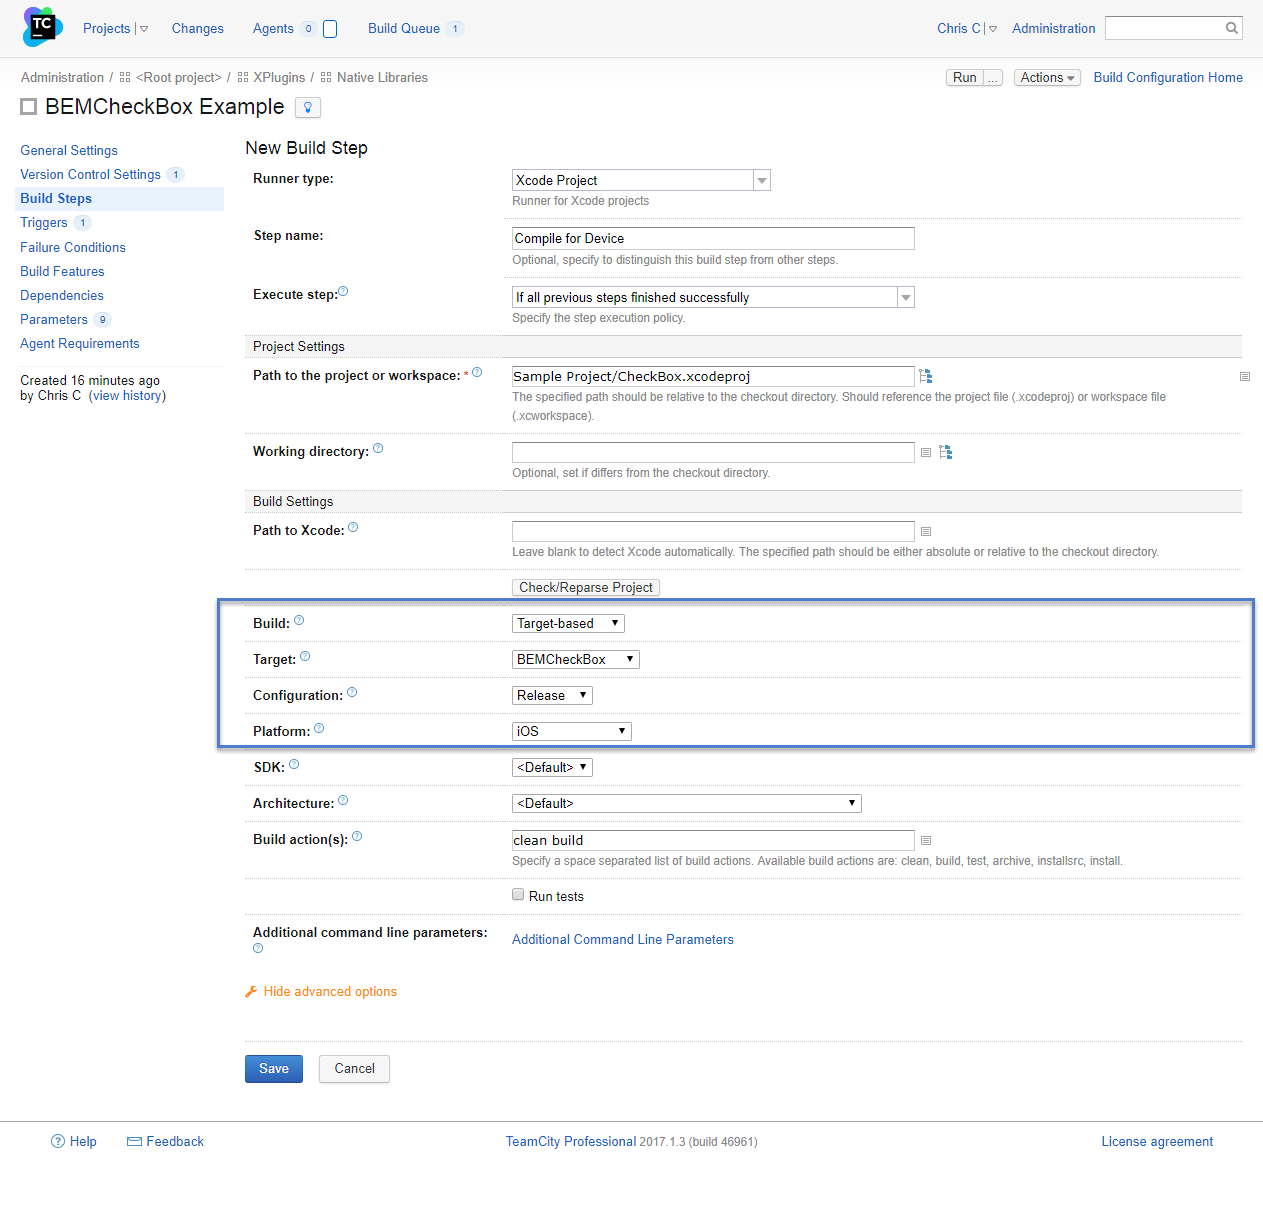
Build Step 1 – Compile to Device

Update (Dec 5, 2017): Please see this post for updated build settings.  In summary you need to use the archive build step instead of build.

First up compiling for the iphone.  In my example we want a target based build to compile the BEMCheckBox framework, not the example program.  Make sure the platform is iOS (ARM).  You might have to click the Check/Reparse Project button to get the settings to show up correctly.

TeamCity Compile For Device

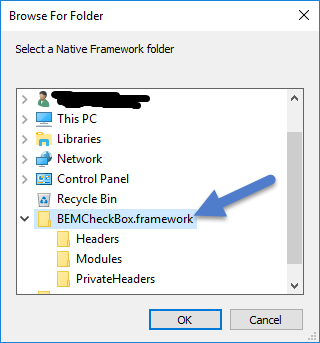
To test this step run your build then look for a BEMCheckBox.framework folder in the build/Release-iphoneos folder on you Mac build machine.  The full path on my build machine is:

 
/Users/username/BuildAgent/work/GUID/Sample Project/build/Release-iphoneos/BEMCheckBox.framework

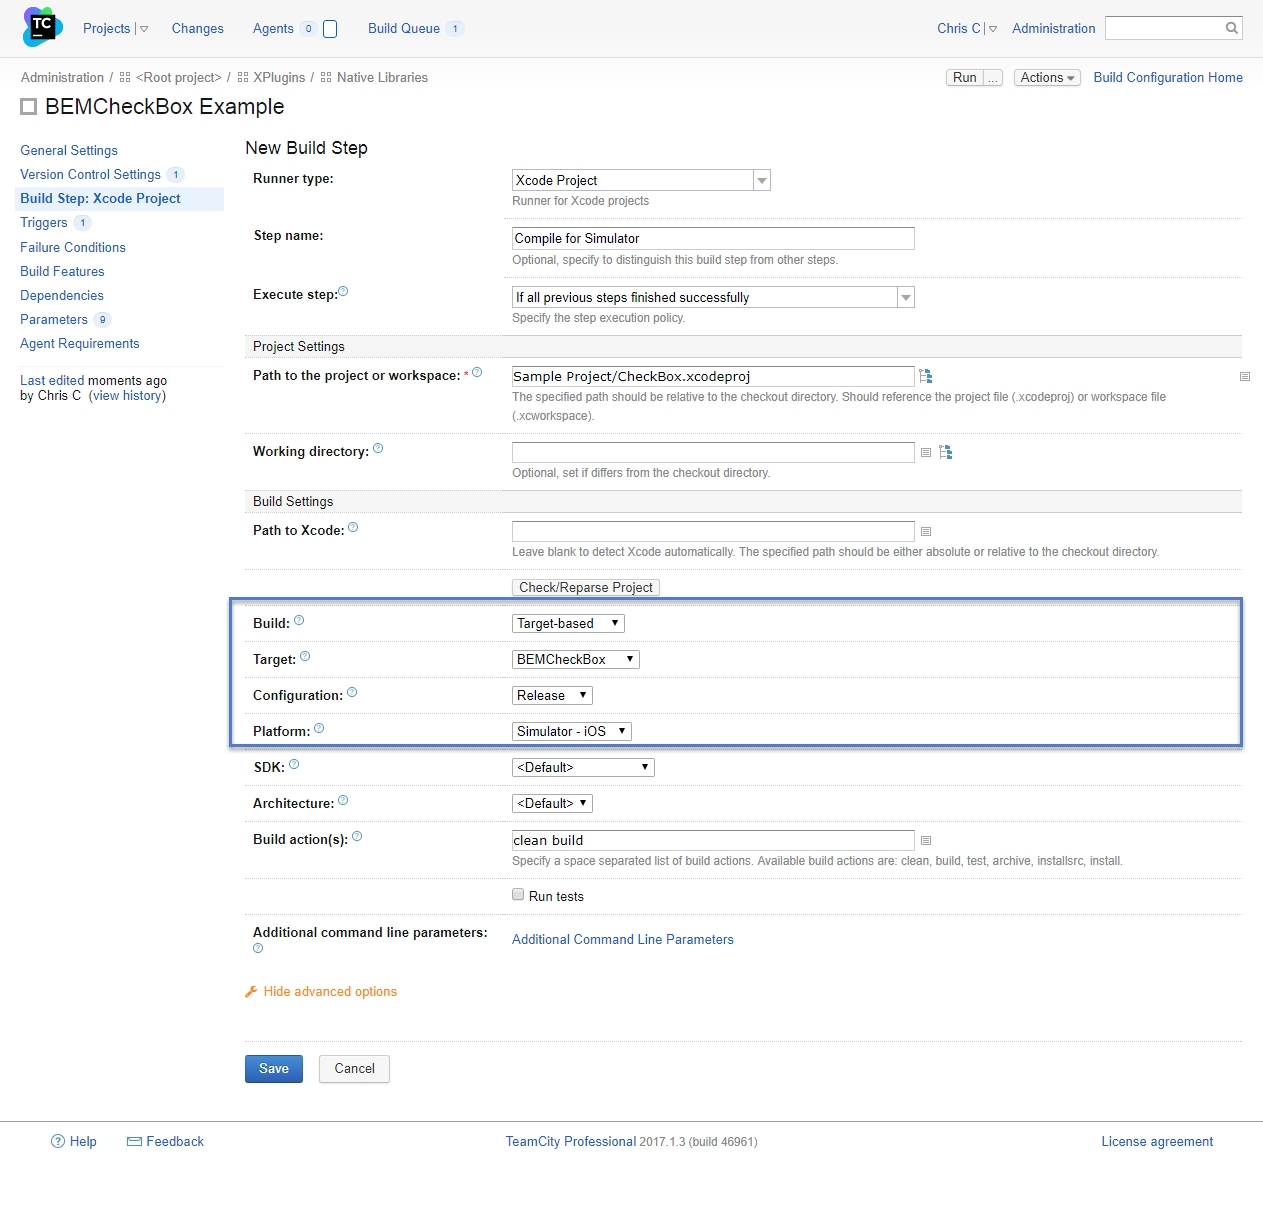
Build Step 2 – Compile to Simulator

Now create another build step for the simulator build.  It will be similar to the previous build step.

TeamCity Compile For Simulator

Again you can test this build step by looking for the BEMCheckBox.framework folder in the Release-iphonesimulator.

/Users/username/BuildAgent/work/GUID/Sample Project/build/Release-iphonesimulator/BEMCheckBox.framework

Build Step 3 – Combine Frameworks

Update (Dec 5, 2017): Please see this post for updated build settings.  In summary some of the paths have changed because the Compile to Device step changed.

The final step is to combine the two builds into one so the framework can be consumed by Xamarin.  To do this use the lipo command.  The manual steps are outlined in my previous post.  To automate this step create a command line build process as shown below:

TeamCity Combine Frameworks Build Step

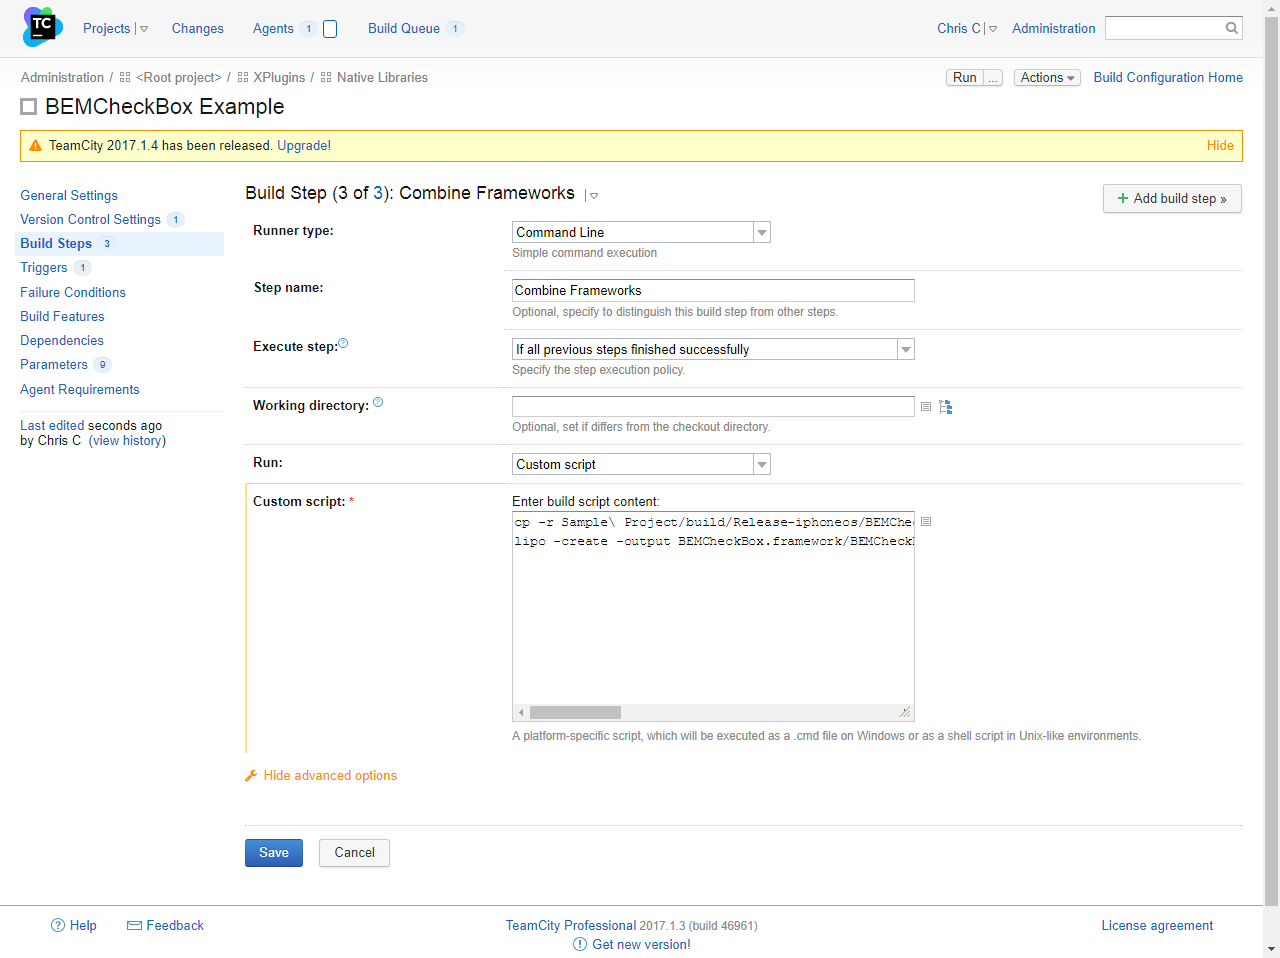
The full command line looks like:

 
cp -r Sample\ Project/build/Release-iphoneos/BEMCheckBox.framework .
lipo -create -output BEMCheckBox.framework/BEMCheckBox Sample\ Project/build/Release-iphoneos/BEMCheckBox.framework/BEMCheckBox Sample\ Project/build/Release-iphonesimulator/BEMCheckBox.framework/BEMCheckBox

To test this step run the build and look a BEMCheckBox.framework folder in root of the work/GUID folder.  In my case the folder can be found at:

/Users/username/BuildAgent/work/GUID/BEMCheckBox.framework

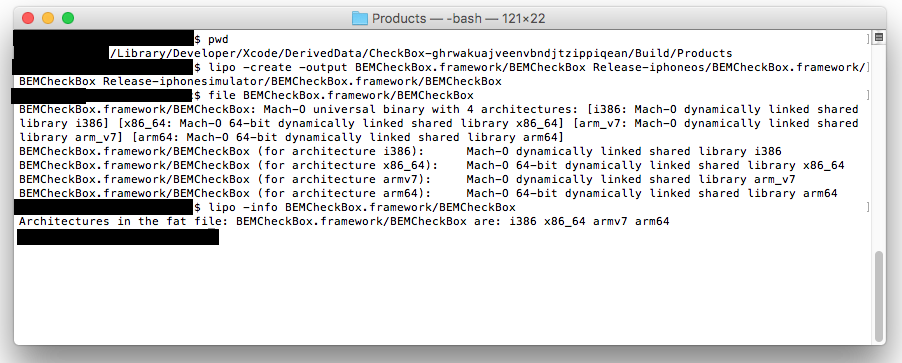
Then run a file command to make sure all 4 architectures are supported.

 
file BEMCheckBox.framework/BEMCheckBox

You should get the following output or something similar:

BEMCheckBox.framework/BEMCheckBox: Mach-0 universal binary with 4 architectures: [i386: Mach-0 dynamically lined shared library i386] [x86_x64: Mach-0 dynamically lined shared library x86_x64] [arm_v7: Mach-0 dynamically lined shared library arm_v7] [arm64: Mach-0 dynamically lined shared library arm64]
BEMCheckBox.framework/BEMCheckBox (for architecture i386): Mach-0 dynamically linked shared library i386
BEMCheckBox.framework/BEMCheckBox (for architecture x86_x64): Mach-0 dynamically linked shared library x86_x64
BEMCheckBox.framework/BEMCheckBox (for architecture arm_v7): Mach-0 dynamically linked shared library arm_v7
BEMCheckBox.framework/BEMCheckBox (for architecture arm64): Mach-0 dynamically linked shared library arm64

You can also use the lipo command tool to check the library.

lipo -info BEMCheckBox.framework/BEMCheckBox

You should see something like:

Architectures in the fat file: BEMCheckBox.framework/BEMCheckBox are: i386, x86_x64, arm7, arm64

In both cases you should see 4 architectures listed.  If you only see two then there is something with this build step.

Artifact

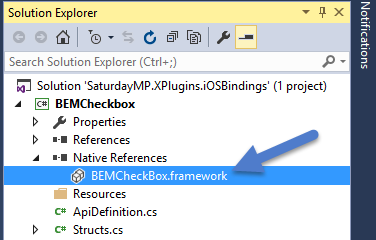
The end goal of all this work is to get a BEMCheckBox.framework that can be consumed by Xamarin.  Set this up as an artifact of the build by navigating the General Settings page.  Then click on the Artifacts Path directory icon and choose the BEMCheckBox.framework folder.

TeamCity Choose Artifact


Run the build one more time and you should see the BEMCheckBox.framework as a artifact.

TeamCity BEMCheckBox Artifact

That’s it.  You are done.  You are a hero for automating a manual process.

Of course you can tweak the build triggers and other settings as needed but the core part of building a Xcode library using TeamCity is done.

You can read how to manually use BEMCheckBox in Xamarin in part 3 and part 4 of the Today I Learned How to Create a Xamarin iOS Binding for Objective-C Libraries post series.  Maybe one day I’ll do a post on how to automate consuming the BEMCheckBox framework in Xamarin.

P.S. – I’m re-watching Stranger Things Season 1 in anticipation of season 2.  One of the more memorable scenes is the end of episode 3 (spoilers) when the Heroes song plays.  In the show the song is preformed by Peter Gabriel but below is the original extended version sung by David Bowie.

https://www.youtube.com/watch?v=jBuwC4VJi50


Posted in Today I Learned | Tagged , , , , | Comments Off on Today I Learned How to Automate Objective-c Builds in TeamCity

First Edmonton .NET Group Talk of the 2017-2018 Season is September 18th

Edmonton .NET User Group LogoThe first Edmonton .NET User Group (EDMUG) talk of the 2017-2018 season is this Monday, September 18th.  The talk is by Shenyi Bao and is titled Web Site Performance Tuning.  All the details can be found here.

Please also don’t forget about the EDMUG survey.  If you are part of the EDMUG group, or are thinking of joining, please take a couple minutes to fill out the survey.

Finally we are always looking for engaging and passionate speakers for the EDMUG meetups.  If you, or someone you know, would like to present please let us know by e-mailing chris.cumming@saturdaymp.com or info@edmug.net.

Posted in Edmonton .NET User Group | Tagged , , , | Comments Off on First Edmonton .NET Group Talk of the 2017-2018 Season is September 18th

Today I Learned How to Install a TeamCity Build Agent on a Mac

When I was first figuring out how to port the BEMCheckBox to Xamarin I built the framework manually.  This is obviously not a good long term solution so I set about figuring out how to automate the build.  The first step was to install the TeamCity build agent on the Mac.  The official TeamCity documentation on how to do this can be found here.

First a little bit about my setup.  My TeamCity server is on a Azure virtual machine (i.e. it’s in the cloud).  My Mac build machine (Mac Book Pro) is sitting beside me in my basement office.  Some of the steps below might differ if your setup is different, such as having the TeamCity server and Mac build machine on the same network.

The Mac build machine and TeamCity server need to talk to each other so make sure you have opened the correct firewall ports and the like.  In my case I had to open up ports on the router in my basement and also ports in Azure.  If you run into trouble try the TeamCity documentation for port numbers.

To test that your TeamCity server and Mac can see each other try installing the build agent via Agent Push.  To do this login to your TeamCity server and click on Agents then Agent Push.

Team City Agent Push

When you click the Install Agent button you will get prompted for some config settings.  Enter them as required.

Team City Agent Push Prompt
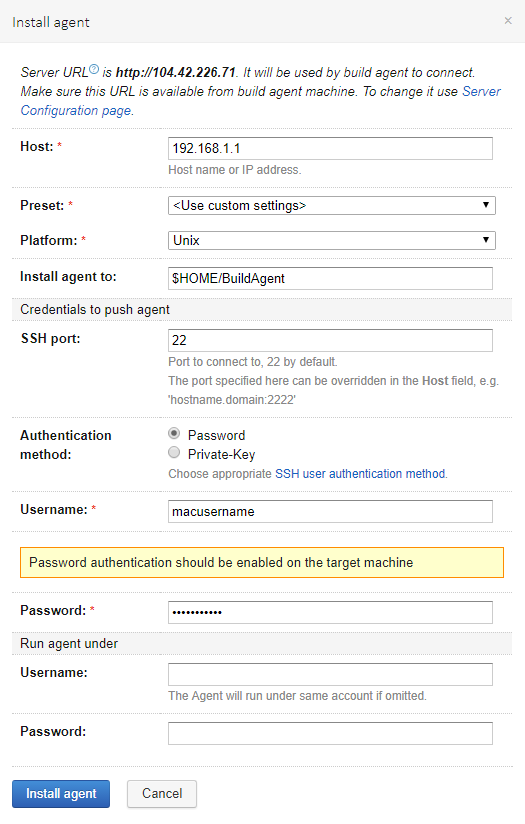
The Host field is the IP address to your Mac build machine, don’t use the local host address in the example.  The Username and Password is an account on the Mac build machine with administrative rights.

A successful install should end with:

 
Done [729], see log at /Users/username/BuildAgent/logs/teamcity-agent.log
WARNING: The TeamCity Agent installed as standalone application and will not start automatically on machine reboot.
Cleaning temporary installation's resources...
Removing './bootstrapper.sh'
Successfully installed build agent on 'computername.local' to '/Users/username/BuildAgent'

If you get any errors it’s probably related to your firewall settings and/or user permissions.

Once the agent is installed you should take a quick look at the conf/buildAgent.properties file and make sure it’s correct.  In my case I had to fix the serverUrl and set the name properties.  For some reason it’s duplicated.  The initial file looked like:

## TeamCity build agent configuration file

######################################
# Required Agent Properties #
######################################
## The address of the TeamCity server. The same as is used to open TeamCity web interface in the browser.
serverUrl=http://123.123.123.123serverUrl=http://123.123.123.123

## The unique name of the agent used to identify this agent on the TeamCity server
## Use blank name to let server generate it.
## By default, this name would be created from the build agent's host name
name=

I updated the file to:

## TeamCity build agent configuration file

######################################
# Required Agent Properties #
######################################
## The address of the TeamCity server. The same as is used to open TeamCity web interface in the browser.
serverUrl=http://123.123.123.123

## The unique name of the agent used to identify this agent on the TeamCity server
## Use blank name to let server generate it.
## By default, this name would be created from the build agent's host name
name=MyMacBuildMachineName

Once you have updated the properties file create the logs folder.  Then get the build agent to connected to the TeamCity server and update it’s self.  This might take several minutes and you can watch the progress in the log file.

mkdir BuildAgent/logs
sh BuildAgent/bin/mac.launchd.sh load
tail -f BuildAgent/logs/teamcity-agent.log

If this command fails then it’s likely the build agent can’t connect to TeamCity.  Make sure the serverUrl property is correct and double check your firewall ports.  Once it’s done the agent should appear in the TeamCity interface as a unauthorized agent.

Team City New Unauthorized Agent

To authorize this agent click on the Unauthorized link and it will be authorized.  Now you are good to go.  In a future post I’ll describe how I actually build Xcode projects with TeamCity.


P.S. – Thought this song might be appropriate today.

Posted in Today I Learned | Tagged , , | Comments Off on Today I Learned How to Install a TeamCity Build Agent on a Mac

Edmonton .NET User Group Survey

Edmonton .NET User Group LogoIf you are part of the Edmonton .NET User Group or are thinking of joining then please fill out this survey.  The survey will help us plan out the 2017-2018 year.  The survey will only take a couple minutes so fill it out during your next coffee break by clicking here.

Don’t live in Edmonton?  Then you should join your city’s local friendly .NET group.  Not a .NET developer then join a local friendly group that talks about technology you are interested in.

P.S. – We are always looking for passionate speakers to share their knowledge.  If you, or someone you know, would like to present at one of our meetups please contact me.

Posted in Business Side | Tagged , , | Comments Off on Edmonton .NET User Group Survey

Sabbatical is Over, Looking for Work

Zig Ziglar Work Job QuoteThe leaves are starting to change, the days are getting shorter, and the garden is ready to harvest.  That means fall is here in all it’s glory.  It also means my summer sabbatical is over.

I spent my sabbatical teaching myself mobile phone development and working on Arduino projects with my daughter.  While I enjoyed my sabbatical I’m looking forward to working again.  It feels good to serve others and be rewarded with multi-coloured certificates of appreciation with The Queen or Prime Ministers faces on them on them (i.e  money).

Some of the ways my work can make your life better include:

  • Create an application to solve a problem.
  • Upgrade and/or refactor your existing legacy application.
  • Help you pick the right technology for your needs.
  • Simplify a complicated part of your application and/or business.
  • Research and develop solutions to hard7uih software problems.
  • Automate your build and deployment process.
  • Database design, optimization, and migration.

More information about me can be found on my company website, resume, LinkedIn, and GitHub profile.  I can be reached by phone at 780-886-3406 or by e-mail at chris.cumming@saturdaymp.com.  I look forward to working with you.

Posted in Business Side | Tagged , , , | Comments Off on Sabbatical is Over, Looking for Work

Thank You Liv

After almost a year hard work Liv has reached her goal and been accepted to the Edmonton Police Service (EPS).  Needless to say she was a bit excited when she got the call.

Unfortunately joining the EPS means Liv no longer has time to work with Saturday MP.  At least in the immediate future.  That means there will be a drought of cartoons and a decrees in qualty qulity quaity quality of the blog and social media posts.  We are as sad as you are but also happy Liv was able to accomplish her goal.

Edmonton Police Service Logo

Everyone should admire Liv’s dedication and hard work.  She never gave up.  We are very proud of her accomplishment and wish her all the best in her new career.  Hopefully our paths will cross again in the future.

Posted in Business Side | Tagged , | Comments Off on Thank You Liv

Do you Still Need to Compress Pictures?

Mini-Compressor LogoI hope you had a great summer vacation.  We sure did and are trying squeeze in a mini-vacation before the summer is officially over after the Labour Day long weekend.

Now that your summer vacation is over you want to share your pictures with friends, family, subscribers, and strangers on the Internet.  How do you do that?

Today you just login to Facebook, Flickr, Snapchat, iCloud, Google Photos (formally Picasa), Shutterfly, etc, and upload your pictures.  If you took the pictures with your phone your picture might have been auto-magically uploaded to iCloud or Google.  You don’t need to worry about the size of the picture or how much memory it consumes.  Often the service will compress your picture on the fly as needed.

It’s even easy to send pictures directly to one or a couple people by attaching the photos to an e-mail or text message on your phone.  The size limits for both e-mail and text attachments is very generous.  For example GMail allows 25MB attachments.  No need to compress, at least most of the time.

Why am I rambling about image compression?  Because Saturday MP sells Mini-Compressor, a program to compresses images.  Is Mini-Compressor still relevant today?  Is it worth my time and money to continue to support and sell it?

If you still use Mini-Compressor please let us know.  If you don’t please also let us know.  You can let us know via e-mail, Facebook, or Twitter.  Haven’t heard of Mini-Compressor before and don’t know if you need it then try it for free (click the Try Now button).

I’m also curious if people would be more comfortable buying Mini-Compressor on the Windows Store instead of the Saturday MP website.  If I did release Mini-Compressor on the Windows Store it would lose the right click feature (link with eye glazing technical details).  I always thought that was one of the best features of Mini-Compressor but maybe I’m wrong.

If you are a current user of Mini-Compressor don’t worry it won’t disappear.  In the worst case, I’ll open source it and make sure the existing installers and executables are freely available.  Finally thank you for using Mini-Compressor, I hope it made you life better in some small way.

Posted in Business Side, Mini-Compressor | Tagged , | Comments Off on Do you Still Need to Compress Pictures?

Looking for Speakers for the Edmonton .NET User Group

Edmonton .NET User Group LogoAre you passionate about software development and want to share your passion with others?  If so then the Edmonton .NET Users Group is looking for you. Specifically as the newly elected Program Director I’m looking for you to speak at one of our meetups.

Already a member?  That’s even better.  Don’t hold back, share with the group.

You don’t have be a world-renowned speaker.  In fact, the .NET Users Group is a friendly and supportive environment for first time speakers.  The biggest thing we ask for is passion and willingness to share your knowledge.

Talks can be about anything you like as long it is related to software development in some form.  It also helps if the talk is related to .NET or Windows.  If you, or someone you know, is interested in presenting please let me know via e-mail or contact me via Meetup (click on my picture).

P.S. – Not interested in speaking but want to connect with passionate, knowledgeable developers?  Join the Edmonton .NET User Group or your friendly local development group.

Posted in Business Side | Tagged | Comments Off on Looking for Speakers for the Edmonton .NET User Group

Today I Learned How to Create a Xamarin iOS Binding for Objective-C Libraries – Part 4 The Actual Binding

This is the 4th and final part about incorporating an objective-c library in Xamarin.  In my case I’m binding BEMCheckBox.  In part 3 we used Sharpie to create a C# interface for the BEMCheckBox.  In this post we will show how to use that interface. Finally you can find a working example of BEMCheckBox in Xamarin iOS here.

First take the APIDefinitions.cs and Structs.cs files in a location accessible to Visual Studio.  Also take the BEMCheckBox.framework folder and move this location accessible to Visual Studio.  For me this means moving the files to my Windows computer.

Now open up the Xamarin project that will consume the objective-c library and add a new project.  When prompted for the type pick Bindings Library (iOS).

Add Binding Library

Next add a reference to the BEMCheckBox framework.  Use the special native reference just as you would a normal reference.

Add Native Reference
Add BEMCheckBox Framework
Native Reference Added

Next replace the ApiDefinition and Structs files with the ones we generated using Sharpie.  First up the the ApiDefinition which originally looked like:

namespace BEMCheckBoxBinding
{
  // The first step to creating a binding is to add your native library ("libNativeLibrary.a")
  // to the project by right-clicking (or Control-clicking) the folder containing this source
  // file and clicking "Add files..." and then simply select the native library (or libraries)
  // that you want to bind.

  // More comments....
}

Now it should look like:

namespace BEMCheckBoxBinding
{
  // @interface BEMCheckBoxGroup : NSObject
  [BaseType (typeof(NSObject))]
  interface BEMCheckBoxGroup
  {
    // @property (readonly, nonatomic, strong) NSHashTable * _Nonnull checkBoxes;
    [Export ("checkBoxes", ArgumentSemantic.Strong)]
    NSHashTable CheckBoxes { get; }

    // @property (nonatomic, strong) BEMCheckBox * _Nullable selectedCheckBox;
    [NullAllowed, Export ("selectedCheckBox", ArgumentSemantic.Strong)]
    BEMCheckBox SelectedCheckBox { get; set; }

    // More properties and methods...
  }

  // @interface BEMCheckBox : UIControl <CAAnimationDelegate>
  [BaseType (typeof(UIControl))]
  interface BEMCheckBox : ICAAnimationDelegate
  {
    [Wrap ("WeakDelegate")]
    [NullAllowed]
    BEMCheckBoxDelegate Delegate { get; set; }

    // @property (nonatomic, weak) id<BEMCheckBoxDelegate> _Nullable delegate __attribute__((iboutlet));
    [NullAllowed, Export ("delegate", ArgumentSemantic.Weak)]
    NSObject WeakDelegate { get; set; }

    // @property (nonatomic) BOOL on;
    [Export ("on")]
    bool On { get; set; }

    // More properties and methods...
  }

  // @protocol BEMCheckBoxDelegate <NSObject>
  [Protocol, Model]
  [BaseType (typeof(NSObject))]
  interface BEMCheckBoxDelegate
  {
    // @optional -(void)didTapCheckBox:(BEMCheckBox * _Nonnull)checkBox;
    [Export ("didTapCheckBox:")]
    void DidTapCheckBox (BEMCheckBox checkBox);

    // @optional -(void)animationDidStopForCheckBox:(BEMCheckBox * _Nonnull)checkBox;
    [Export ("animationDidStopForCheckBox:")]
    void AnimationDidStopForCheckBox (BEMCheckBox checkBox);
  }
}

The structs file originally looked like:

namespace BEMCheckBoxBinding
{
}

Now it should look like:

namespace BEMCheckBoxBinding
{
  [Native]
  public enum BEMBoxType : nint
  {
    Circle,
    Square
  }

  [Native]
  public enum BEMAnimationType : nint
  {
    Stroke,
    Fill,
    Bounce,
    Flat,
    OneStroke,
    Fade
  }
}

Now try to compile and in my case I got a couple of errors.  Depending on what Sharpie generated, or if you did manually, you might get different errors.  In my case I got the following errors:

Type byte, sbyte, short, ushort, int, uint, long or ulong expected

The type or namespace name `NSHashTable' could not be found. Are you missing an assembly reference?

The type or namespace name `ICAAnimationDelegate' could not be found. Are you missing an assembly reference? NativeLibrary1

The first error is in the structs file.  Just delete the nint so it looks like:

namespace BEMCheckBoxBinding
{
  [Native]
  public enum BEMBoxType
  {
    Circle,
    Square
  }

  [Native]
  public enum BEMAnimationType
  {
    Stroke,
    Fill,
    Bounce,
    Flat,
    OneStroke,
    Fade
  }
}

The second error occurs because there is no NSHashTable in Xamarin.  In this case I just deleted the method.  I’ll have to figure out a better solution in the future.

namespace BEMCheckBoxBinding
{
  // @interface BEMCheckBoxGroup : NSObject
  [BaseType (typeof(NSObject))]
  interface BEMCheckBoxGroup
  {
    // Delete this method.
    // @property (readonly, nonatomic, strong) NSHashTable * _Nonnull checkBoxes;
    //[Export ("checkBoxes", ArgumentSemantic.Strong)]
    //NSHashTable CheckBoxes { get; }

    // @property (nonatomic, strong) BEMCheckBox * _Nullable selectedCheckBox;
    [NullAllowed, Export ("selectedCheckBox", ArgumentSemantic.Strong)]
    BEMCheckBox SelectedCheckBox { get; set; }

    // More properties and methods...
  }
}

Finally to fix the last error just remove the ICAAnimationDelegate inheritance.  In this case we don’t need it.  At least I don’t think we do.  The checkboxes seem to work fine without it.

namespace BEMCheckBoxBinding
{
  // @interface BEMCheckBox : UIControl <CAAnimationDelegate>
  [BaseType(typeof(UIControl))]
  interface BEMCheckBox
  {
    [Wrap("WeakDelegate")]
    [NullAllowed]
    BEMCheckBoxDelegate Delegate { get; set; }

    // @property (nonatomic, weak) id<BEMCheckBoxDelegate> _Nullable delegate __attribute__((iboutlet));
    [NullAllowed, Export("delegate", ArgumentSemantic.Weak)]
    NSObject WeakDelegate { get; set; }

    // More properties and methods...
  }
}

Now everything should compile.  When the compile succeeds you should find a couple generated files hidden in the obj/Debug/ios/BEMCheckBoxBinding folder.  In this case there are 3 files, one for each interface: BEMCheckBox.g.cs, BEMCheckBoxDelegate.g.cs, BEMCheckBoxGroup.g.cs.

What the Native Binding project does is parse the interface your created and creates an actual class.  The methods are all pass through methods to the underlying objective-c framework and look something like:

[Export ("reload")]
[CompilerGenerated]
public virtual void Reload ()
{
  if (IsDirectBinding) {
    global::ApiDefinition.Messaging.void_objc_msgSend (this.Handle, Selector.GetHandle ("reload"));
  } else {
    global::ApiDefinition.Messaging.void_objc_msgSendSuper (this.SuperHandle, Selector.GetHandle ("reload"));
  }
}

The last thing to do is actually use the new method.  From a iOS project add a reference to the BEMCheckBoxBinding project.  Then create a checkbox as so:

public override void ViewDidLoad()
{
  base.ViewDidLoad();

  Title = "Binding Example";
  var bemCheckBoxLabel = new UILabel()
  {
    Text = "BEMCheckBox:",
    Frame = new CoreGraphics.CGRect(10, 40, 125, 25)
  };

  var checkbox = new BEMCheckBoxBinding.BEMCheckBox(new CoreGraphics.CGRect(140, 40, 25, 25));

  View.AddSubview(bemCheckBoxLabel);
  View.AddSubview(checkbox);
}

And your checkbox should appear.

BEMCheckBox Working Example

You have now successfully bound and objective-c library to and Xamarin project.  Get yourself a couple cookies.  Like a whole box.  Eat some and share them with your friends.

P.S. – This is my favourite cookie monster skit of all time.  No cookie, no guessing game, arrivederci frog.

Save

Posted in Code Examples, Software Development, Today I Learned | Tagged , , , , , | Comments Off on Today I Learned How to Create a Xamarin iOS Binding for Objective-C Libraries – Part 4 The Actual Binding

Today I Learned How to Create a Xamarin iOS Binding for Objective-C Libraries – Part 3 Using Sharpie to Create Binding Interface

This is the 3rd part about using the BEMCheckBox, an Objective-C library, in Xamarin.  Part 1 described how to compile the BEMCheckBox library using Xcode.  Part 2 showed how to combine the multiple libraries we compiled from Part 1 into one library.  In this part I’ll describe how to use Sharpie to create the C# API interface.

Sharpie is a tool that reads the header files in the BEMCheckBox framework and extract a C# interface.  We could create the interface manually but it’s easier if we let technology do some of the work for us.  Don’t worry about this job being replaced by a robot as we will have to manually edit the file after it’s generated, at least for BEMCheckBox.  Download the sharpie tool here and read more about the sharpie here.

Remember this screen shot from Part 2 where we merged two libraries into one?

Lipo Command Screen Shot

This is the library we created that supports multiple architectures (x86, x64, Arm7, Arm64).  We need to run Sharpie on this the header files in this single framework.  Open up the terminal and run this command to see what sdk versions are installed.

sharpie xcode -sdks

This will show something like:

sdk: appletvos10.2    arch: arm64
sdk: iphoneos10.3     arch: arm64  arm7
sdk: macosx10.12      arch: x86_64 i386
sdk: watchos3.2       arch: arm7k

Once you know the iphone sdk version you can run the actual sharpie command.  Run this command against the header files in the BEMCheckBox framework folder.

sharpie bind -sdk iphoneos10.3 BEMCheckBox.framework/Headers/BEMCheckBox.h

The output should look something like:

Parsing 1 header files...

Binding...
  [write] ApiDefinitions.cs
  [write] StructsAndEnums.ca

Submitting usage data to Xamarin...
  Submitted - thank you for helping to improve Objective Sharpie!

Done.

A screen shot of the commands is below.

Sharpie Command

This should generate two files for BEMCheckBox: ApiDefinitions.cs and StructsAndEnums.cs.  For other libraries you might only get one file.

Go ahead and look at the files now.  In the APIDefinitions file you will C# interfaces with a bunch of attributes.  The interface maps the methods in the objective-c header file.  In the StructsAndEnums file you will see enums used by BEMCheckBox.  A snippet of the files is shown below.

API Definitions:

// @interface BEMCheckBox : UIControl <CAAnimationDelegate>
[BaseType(typeof(UIControl), Delegates = new string[] { "WeakDelegate" }, Events = new Type[] { typeof(BEMCheckBoxDelegate) })]
interface BEMCheckBox
{
  [Export("initWithFrame:")]
  IntPtr Constructor(CGRect frame);

  [Wrap("WeakDelegate")]
  [NullAllowed]
  BEMCheckBoxDelegate Delegate { get; set; }

  // @property (nonatomic, weak) id<BEMCheckBoxDelegate> _Nullable delegate __attribute__((iboutlet));
  [NullAllowed, Export("delegate", ArgumentSemantic.Assign)]
  NSObject WeakDelegate { get; set; }

  // @property (nonatomic) BOOL on;
  [Export("on")]
  bool On { get; set; }

  // @property (nonatomic) CGFloat lineWidth;
  [Export("lineWidth")]
  nfloat LineWidth { get; set; }

  // Other methods...

}

Structs:

[Native]
public enum BEMBoxType : long
{
  Circle,
  Square
}

[Native]
public enum BEMAnimationType : long
{
  Stroke,
  Fill,
  Bounce,
  Flat,
  OneStroke,
  Fade
}

This is all well and good but an interface can’t make calls to the underlying objective-c interface.  I’ll discuss how Visual Studio auto-magically creates the wiring between the C# interface and the BEMCheckBox library in Part 4.  For now go ahead and get another cookie.  You deserve it.

Don’t forget you can find a working example of BEMCheckBox in Xamarin iOS here.


P.S. – A classic Cookie Monster song about up and down.  Can you figure out what happened to Cookie Monster’s cookie before the end of the song?

Save

Posted in Code Examples, Software Development, Today I Learned | Tagged , , , , , , | Comments Off on Today I Learned How to Create a Xamarin iOS Binding for Objective-C Libraries – Part 3 Using Sharpie to Create Binding Interface