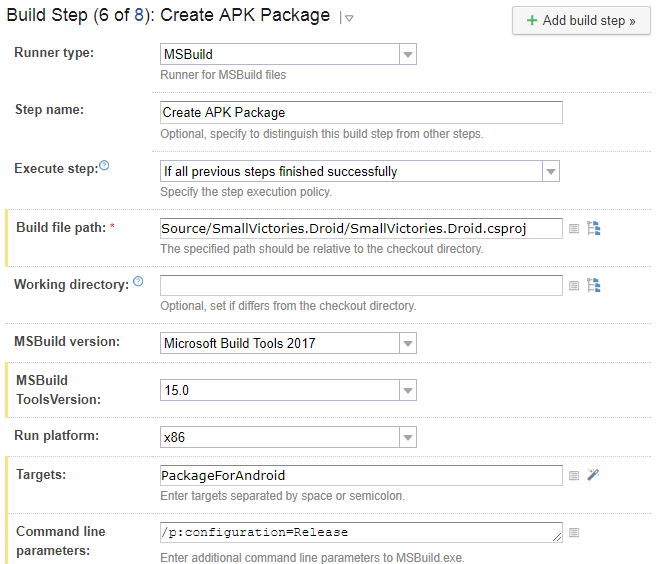
When building a Xamarin application one step is to build the Android APK file. This is a MsBuild step in TeamCity that looks like:
This step generates the following error:
[15:55:53][Source\SmallVictories\SmallVictories.csproj] CopyRealmWeaver
[15:55:53][CopyRealmWeaver] CopyRealmWeaver
[15:55:53][CopyRealmWeaver] Copy
[15:55:53][Copy] Creating directory "*Undefined*Tools".
[15:55:53][Copy] C:\BuildAgent\temp\buildTmp\.nuget\packages\realm.database\2.1.0\build\Realm.Database.targets(28, 5): error MSB3021: Unable to copy file "C:\BuildAgent\temp\buildTmp\.nuget\packages\realm.database\2.1.0\build\..\tools\RealmWeaver.Fody.dll" to "*Undefined*Tools\RealmWeaver.Fody.dll". Illegal characters in path.
[15:55:53][Step 6/8] Error message is logged
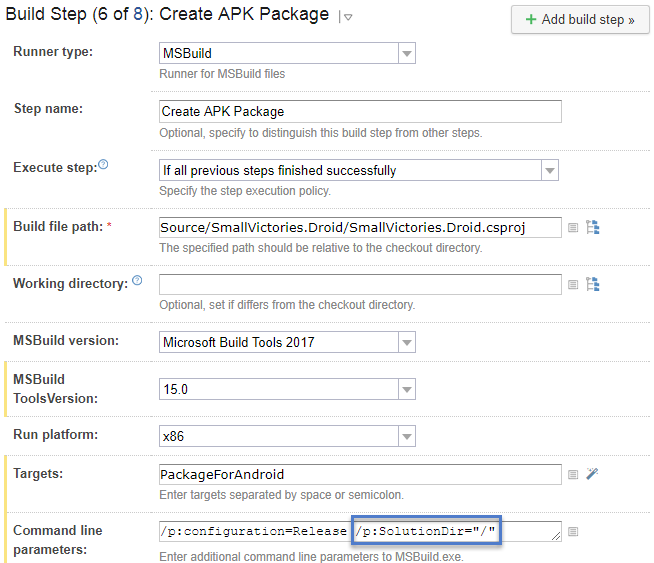
Notice the “*Undefined*Tools” in the directory path. To fix this step you need to add /p:SolutionDir=”/” to the command line. So now the build step looks like:
You can find more about the bug in this GitHub issue and more about the fix in this blog post.
This post is part of a larger discussion about temporal databases. Hopefully it stands on it’s own but for more context see the Temporal Database Design page. You can read the official Wikipedia definition but for our purposes a Temporal Database is a database where you can query for historical data using SQL. This is work in progress and constructive feedback via e-mail, at chris.cumming@saturdaymp.com, is most appreciated.
In the last Temporal Database post I introduced timelines. In this post we will talk about the one rule you cannot break:
Timeline segments cannot overlap!
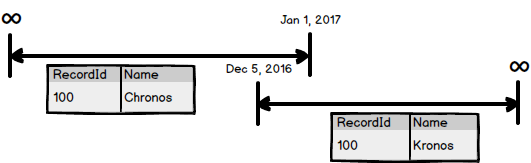
That’s it. That is the one rule. Breaking this rule leads to all sorts of problems when you try to actually implement timelines in a database. Aside from creating problems at the database level it also creates theoretical headaches. For example, if you have the following in your customer table:
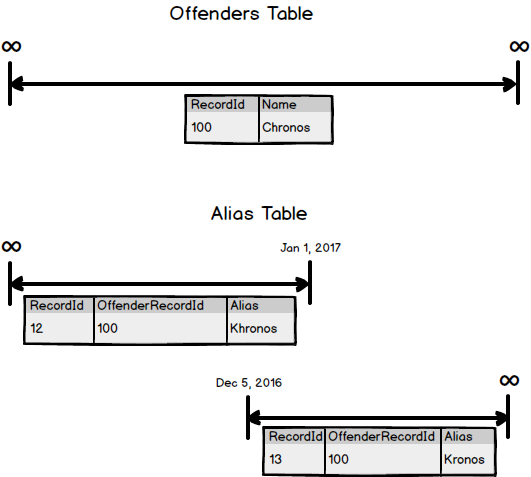
What is Chronos’s name on December 20th? Is it Chronos or Kronos? That said it is possible for people to have two names at the same time. We have nicknames, aliases, and the like. If you need to create a database that supports multiple names, say a police database, you can have an Aliases table that hangs off the Offenders table. For example:
Chronos has an offender record with the name but also has two timelines in the Alias table with his over names. Notice that alias table has two timelines, not one segment with overlapping segments.
How you design your temporal database will depend on your business logic but you must remember that there is one rule you can’t break:
This post is part of a larger discussion about temporal databases. Hopefully it stands on it’s own but for more context see the Temporal Database Design page. You can read the official Wikipedia definition but for our purposes a Temporal Database is a database where you can query for historical data using SQL. This is work in progress and constructive feedback via e-mail (chris.cumming@saturdaymp.com) is most appreciated.
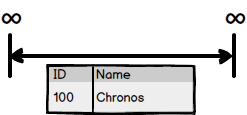
In a non-temporal database a record dose not change over time. For example say you have a Contacts table with a name field.
A record in that table does not change over time. Record 100 either has the name Chronos of some other name. If you think of this record from a temporal point of view it’s a record starts at the beginning of time and goes to infinity. If we where to represent this record using a timeline it would look like:
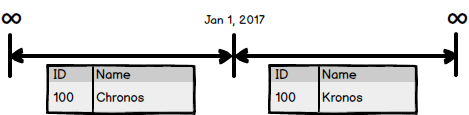
Now lets make the table effective-temporal. The technical details of how we do this in the database is not important right now. For now lets just focus on the timeline. Say Chronos changes his name to Kronos on January 1, 2017 then our timeline would look like:
We are going to assume gods aren’t born and don’t die so the timeline still goes from start of time to infinity. However, the timeline now consists of two segment. The first segment goes from the start of time to Dec 31, 2016. The second segment goes from Jan 1, 2017 to infinity.
Notice that the ID does not change. It’s still 100 in both segments. Chronos changed his name to Kronos but he is still the same person, er god.
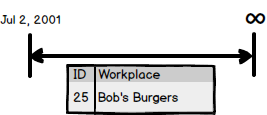
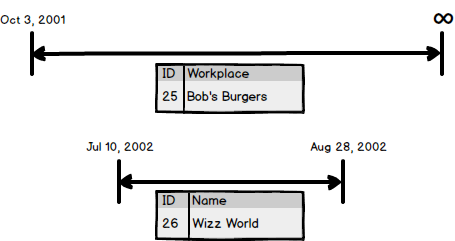
One more example. In this case lets track where John Doe works as he goes through high school. Lets start in grade 10 with his first job as a burger flipper. He works in the weekend as he attends school. The workplace timeline looks like:
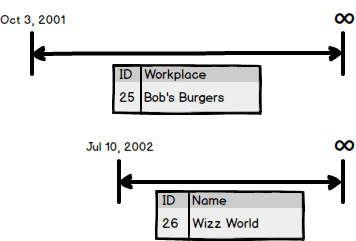
In the summer John continues to work at Bob’s Burgers but also gets a second job as a life guard at the water park Water Wizz.
Now John Doe has two timelines one for Bob’s Burgers and one for Water Wizz. When summer ends John leaves Wizz World but keeps his burger flipping job in Grade 11 so now his employment timelines look like:
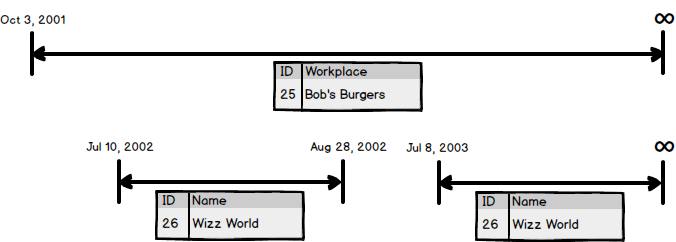
Notice that the timeline for Wizz World has ended but Bob’s Burgers continues. In the summer between grade 11 and 12 John is again hired by Wizz World because he such a good worker. Now his employment timelines look like:
One of the challenges when creating a temporal database is deciding when to create new timelines and when to create new segments. In this case we decided to use the existing Wizz World timeline and add a segment to it. If the employer stays the same keep the timeline, if the employer is different create a new timeline.
Also notice that the Wizz World timeline has a gap in the segments, which is just fine. What you can’t have is a timeline with overlapping segments. You can have timelines that overlap but a timeline can’t have overlapping segments.
Let’s talk more about overlapping segments and other stuff in a future segment. Ah, time jokes, they never get old.
Notes I took while trying to fix the Incomplete Bitcode error in submission bug. Not sure if it’s fixed yet as I haven’t tried submitting an app to the App Store yet. Hopefully someone else will try it and confirm it’s fixed.
In summary when submitting an app to iTunes Connect that has the XPlugins.iOS.BEMCheckBox the user got the following error:
ERROR ITMS-90668: “Invalid Bundle Executable. The executable file ‘InstantApp.BoostOrder.Customer.Touch.app/Frameworks/BEMCheckBox.framework/BEMCheckBox’ contains incomplete bitcode. To compile binaries with complete bitcode, open Xcode and choose Archive in the Product menu.”
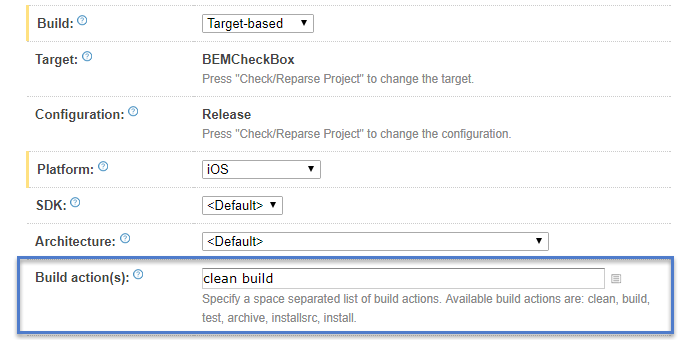
My build settings for compiling the BEMCheckBox framework look like:
The look the same for compiling for both the device (ARM architecture) and the simulator (x86/x64 architecture). I started with the build step that compiled the device and after some research I figured the problem was the build actions. Instead of doing build I should do an archive.
Updating Compile for Device Settings
To create an archive requires change the build from Target-based to Schema-based. There was a couple other changes required which are outlined below.
Make sure the project build settings are up to date by clicking the Check/Reparse Project.
Change to Scheme-based.
Set the scheme to BEMCheckBox.
Use the output directory or xCode will put the build god-knows-where.
Change the build action from build to archive.
Did a build and everything compiled. Lets do the same for the simulator build.
Updating Compile for Simulator Settings
Actually you don’t need to change anything for the simulator build. You can’t create an archive for simulators. As usual it took me some time to figure out nothing needs to be done. Aren’t you glad you are reading this instead of wasting time like I did?
Update Script that Combines the Builds
After compiling for the device and the simulator the builds need to be combined into one package. In my build this is done via a script and a minor update was required because the path changed when we built the archive for the device.
Notice the path for the device build has been changed. It no longer gets put in the Sample Project folder. I couldn’t figure out a way to get the paths the same for both build so I just gave up.
Anyway, there are my notes on the changes I did. Not sure if my changes fixed the orginial problem. If you use XPlugins.iOS.BEMCheckBox please let me know either way. Thank you to jjchoo for originally reporting the problem.
Our family vacation is over and the basement is back open for business. Actually we where open on Monday but I forgot to remove the digital closed signed. Sorry about that.
On this trip we visited Hong Kong and Shanghai, spending about a week in each city. This is our second time to Honk Kong and we got to see and do things we missed on our first visit. This includes hanging out at a beach and swimming, hiking the highest mountain in Hong Kong, a helicopter ride (sponsored by our daughter who saved her money for a year), and visiting the highest building in Hong Kong.
This was our first time to Shanghai and it contrasts nicely with Hong Kong. Hong Kong is hilly and the population is concentrated in small pockets on the flatter parts. Shanghai is flat with less hi-rises. It reminds me of LA, a flat city that stretches for miles.
We stayed near the historic Old Town and did the usual tourist things like visiting People’s Square, toured The Bund, and looked out over Shanghai half a kilometer in the sky in the Shanghai Tower (the second highest building in the world).
Finally we visited both Hong Kong Disneyland, for a second time, and Shanghai Disneyland. That means we have visited three of the six Disney Resorts having visited the original Disneyland in California in the past. We have a family goal to visit all six Disney Resorts before my darling daughter turns 18 to help her become an Imagineer. That and we really like the Disney parks.
Thank you for your patience during our absence. We have settled into our normal routine and look forward to serving you with refreshed enthusiasm.
Posted inUncategorized|Comments Off on Family Vacation is Over
Saturday MP is a small family business and like your local family run restaurant the entire family is involved in some way. Currently it’s mostly me working at Saturday MP but Ada helps with some book keeping and in the past was a consultant. Our daughter also used to clean the basement office and shred papers.
Also, like your local family restaurant, when we take a vacation the entire business closes. Well, mostly closes, we can still be reached virtually but please expect delays in our response. Thank you for your patience and we look forward to serving you when we get back to the basement on November 27th.
It had the slash after the “.com” but was missing the www and didn’t have HTTPS. At first I thought the problem was the missing www but I was wrong. The problem was in the redirect from HTTP to HTTPS. Lets take a look at the apache site config file for Saturday MP where the redirect lives.
Notice the slash is missing at the end of the redirect? That is the problem. To fix it add a backslash so the redirect looks like:
Redirect permanent / https://www.saturdaymp.com/
After you add the backslash don’t forget to reboot your webserver, which I did. You will also have to clear your browser cache, which I didn’t do. It took me another hour to figure out the above fix actually did work because I didn’t clear out my browser cache. Always clear our your browser cache when testing websites.
P.S. – For those not into 80’s hair bands Slash is the one with hat, curly hair, and memorable guitar licks. The opening to Sweet Child O’ Mine is actually a guitar exercise Slash used for practice and warm-up. Finally make sure you listen to the uncut version. In the cut version almost a minute of Slash’s guitar solo is missing.
https://www.youtube.com/watch?v=YFQaUA-vBbI
Posted inToday I Learned|TaggedApache, https|Comments Off on Today I Learned The Final Backslash is Important in Apache HTTPS Redirects
This post is part of a larger discussion about temporal databases. Hopefully it stands on it’s own but for more context see the Temporal Database Design page.
Most of us have worked with database tables that track some historical information. You add a EffectiveDate column or something similar and usually it’s just limited to a table to two. A Temporal Database is designed so most or all of the tables can track historical information.
The important part is that you can access the historical database using a SQL query and don’t have to look elsewhere, such as audit log. This is what makes a database a Temporal Database, at least according to me.
Degree of Database Temporalness
A database can either be non-temporal, partial temporal, or fully temporal. You can measure the temporalness by the percentage of tables that store temporal data.
Non-Temporal (0% Temporalness): Database has no temporal capabilities.
Partially Temporal (1% – 99% Temporalness): The database has some tables store temporal data but not all.
Fully Temporal (100% Temporalness): All the tables in the database store temporal data.
Type of Table Temporalness
We don’t measure how temporal a table is by percentage. Instead a table is defined by what type of historical data you can retrieve. There are two types of historical data:
You can read the official Wikipedia definition but for our purposes it’s a database where you can query for historical data using SQL.
For example, say you have someone named Chronos who lives in New York but on April 15, 2012 moves to Hong Kong. If you don’t have an historical tracking then you will only be able to see that Chronos lives in Hong Kong. You don’t know where he lived before Hong Kong or when he moved to Hong Kong.
// Instantiate the constraint.
Assert.That(expected, new EquivalentPropertyWiseToConstraint(actual));

// Matches syntax.
Assert.That(expected, Is.Not.Matches(new EquivalentPropertyWiseToConstraint(actual)));
It would be nice to write:
// Directly access the constraint from Is.
Assert.That(expected, Is.EquivalentPropertyWiseTo(actual));

// Chain the constraint in Is.
Assert.That(expected, Is.Not.EquivalentPropertyWiseTo(actual));
To do that you should read the documentation. End of blog post.
So is that joke still funny? No, OK, no more. Lets get back to what we are doing. To access the method using Is you need to override the Is class and add a static method. I recommended making the method name similar to your constraint name. For example:
public class Is : NUnit.Framework.Is
{
  public static EquivalentPropertyWiseToConstraint EquivalentPropertyWiseTo(object expected)
  {
    return new EquivalentPropertyWiseToConstraint(expected);
  }
}
Now you can directly access your custom constraint via Is like:
// Directly access the constraint from Is.\
Assert.That(expected, Is.EquivalentPropertyWiseTo(actual));
However, if you try to chain the method it won’t work. For example, this will throw an error:
To fix this we need to create an extension method. The name of the class is not important but the name of the extension method should match the name you used above when overriding the Is class. The method needs to create your constraint and append it to the constraint expression.
public static class CustomConstraintExtensions
{
  public static EquivalentPropertyWiseToConstraint EquivalentPropertyWiseTo(this ConstraintExpression expression, object expected)
  {
    var constraint = new EquivalentPropertyWiseToConstraint(expected);
    expression.Append(constraint);

    return constraint;
  }
}
Now you can chain your customer constraint and the following will work:
// Will compile now that the extension method exists.
Assert.That(expected, Is.Not.EquivalentPropertyWiseTo(actual));
Now you have a fully working custom NUnit constraint. For a working example please see the NConstraint project. End of blog post.
P.S. – Another of my favourite Tragically Hip songs. I used to listen to this song a lot when working late nights at my first programming job.
Everything is bleak
It’s the middle of the night
You’re all alone and
The dummies might be right
You feel like a jerk
My music at work
My music at work