A rate limiting demonstration using NGINX and Fail2Ban based on a presentation that I gave at BSides Edmonton in 2022. Follow along with the GitHub repo here.
Be sure to admire the seamless editing due to a power outage issue towards the end of the video.
Thank you to BSides Edmonton for allowing me to present last year. I also had a great time as an attendee at the 2023 conference.
Have question you want answered in a future video? A question I should ask you? Pair on a problem? Constructive feedback? Comment, DM me, or send an email to ask@saturdaymp.com.
I attempted to create a pull request (PR) for the Standard Ruby Linter bug I’ve fixed but ran into a merge conflict. Didn’t create the PR but did figure out the solution to the merge conflict that will be fixed in the next video.
Read about the bug I’m trying to fix here. Other videos fixing the Standard Ruby Linter Todo Bug:
Thanks to Test Double for creating Standard! It is a great linter for Ruby projects.
Have question you want answered in a future video? A question I should ask you? Pair on a problem? Constructive feedback? Ping me at ask@saturdaymp.com.
I am excited to announce that I’ll be attending BSides Edmonton this year! I’m looking forward to increasing my cyber security knowledge from the talks, CTF, and fellow attendees.
Specially I’m looking to learn the latest best practices for protecting my clients websites and their underlying servers. Is this something you can help me with? If so let me know and we can chat either at the conference or some other time.
I’m also happy to chat about software development, DevOps, legacy code, board games, Warhammer 40K lore, amount other things. I’m also happy to pair on some CTF problems.
Getting to the end of fixing the Standard Ruby Linter ToDo bug. In this video I refactor and remove duplicate code from a system tests that are similar. It goes well for the most part. The only hiccup is the trying to figure a way to run setup code once for all the tests in the file.
Read about the bug I’m trying to fix here. Other videos fixing the Standard Ruby Linter Todo Bug:
Thanks to Test Double for creating Standard! It is a great linter for Ruby projects.
Have question you want answered in a future video? A question I should ask you? Pair on a problem? Constructive feedback? Send an email to ask@saturdaymp.com.
The system test is finally working!! I go over, again, why it’s important to make sure your tests fail. Now that the test is working I start refactoring it to remove duplicate code.
Spent longer then I would have thought trying to get a before setup method to work in MiniTest. During my investigation I think I got the JetBrainsAI to suggest a fix for a MiniTest PR that was rejected which was interesting to see.
Have question you want answered in a future video? A question I should ask you? Pair on a problem? Constructive feedback? Send an email to ask@saturdaymp.com.
Contact me if you need help shipping secure high quality software faster. See Saturday Morning Productions for more details.
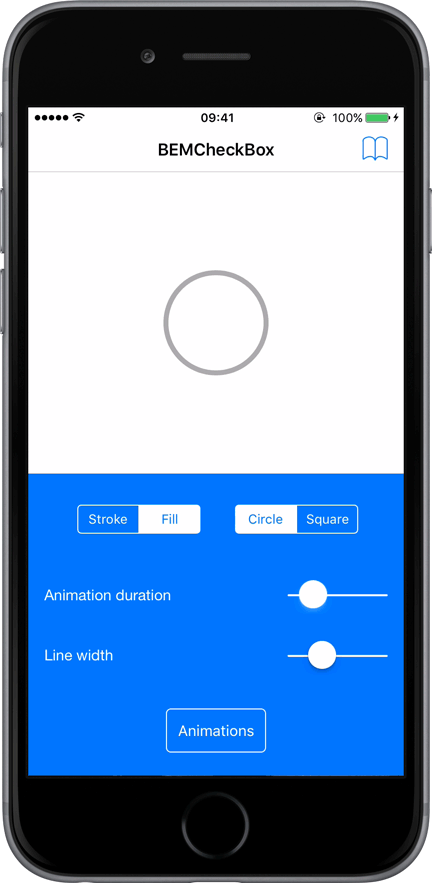
I’m happy to announce that XPlugins.iOS.BEMCheckBox v2.0.0 has been released! This a wrapper for the BEMCheckBox which lets you create highly customizable, animated checkboxes for iOS. You can find the v2.0.0 NuGet package here.
This release includes all the fixes to the underlying BEMCheckBox from v1.4.1 to v2.0.0. This includes the following breaking changes:
Minimum iOS version was increased from 8.4 to 12.
Events renamed:
DidTapCheckBox renamed to DidTap
AnimationDidStopForCheckBox to AnimationDidStopFor
Give it a try and let me know if you spot any errors or improvements by opening a issue or pull request. Please also send me any questions you have via a issue.
Thank you Boris-Em for creating BEMCheckBox. Myself, and likely lots of other people, really appreciate it.
I get my system test working at the start of video but the problem is it works so well that it still passes even after I re-introduce the bug when it should have failed. Crap! That means my test is not working correctly.
I spend the rest of the video trying to figure out why the test is not failing when it should and get very frustrated. So frustrated this became my longest video yet at over two hours! End up digging into the RuboCop code to try and figure out what is going on. I do figure out the problem at the end of the video in a ah-ha moment. Spoiler: the problem was I didn’t link to the Standard config file correctly.
My personal takeaway from the video is I should have taken a break and viewed the problem later with fresh eyes and brain. A problem I’ve struggled with for as long as I can remember. Always easier to notice in hindsight.
On the plus side I think this video highlights the importance of making sure your test fails. Either by writing the test before your fix (e.g. test first development) or by reverting the fix like I did in this video. Writing passing tests is easy. Writing passing tests that actually correctly test your fix is harder.
Sorry for the long video and long sections of me thinking and not talking. Unless you like long videos of me struggling in silence, then you are welcome.
Have question you want answered in a future video? A question I should ask you? Pair on a problem? Constructive feedback? Send an email to ask@saturdaymp.com.
I get one system test working for generating the todo file and almost get the second test working. The second test that actually tests the bug we fixed. Went down a bit of rabbit hole trying to get the optimal Ruby file/directory manipulation code.
I also spent some time trying out JetBrains new coding AI. It has some issues but also lots of promise.
Read about the bug I’m trying to fix here. Other videos fixing the Standard Ruby Linter Todo Bug:
Have question you want answered in a future video? A question I should ask you? Pair on a problem? Constructive feedback? Send an email to ask@saturdaymp.com.
I’m happy to announce that BEMCheckBox v2.0.0 has been released! It is a open source library making it easy to create beautiful, highly customizable, animated checkboxes for iOS. You can find the install instructions here.
This a forked release as it does not appear the original project by Boris-EM is supported. If Boris-EM, or anyone else with access to original repo, is reading this I’m happy to merge my changes back. It should be noted that don’t have great track record of supporting my open source projects but I’m hoping to improve my stats.
This release includes all the fixes in the original repo along with a some new ones. It also has two breaking changes:
Event names have changed. Specifically didTapCheckBox to didTap and animationDidStopCheckBox to animationDidStop.
I have not pushed a new CocoaPods release. The last CocoaPods release was in 1.4.1. If this is something people are interested in please let me know and I’ll look into it. My main goal is to do another release of the Xamarin wrapper of the BEMCheckBox.
Truth be told I’m not very familiar with Xcode/Swift development so if anyone notices any issues with my fork please let me know by opening an issue or a pull request.
Thank you Boris-Em for creating BEMCheckBox. Myself, and likely lots of other people, really appreciate it.
Similar to the previous episode I fail at adding a system test. Should I be live coding all these failures? I think so. Maybe? Do they make boring videos? Probably. Should I say “ummm” less? Most definitely.
I think there are enough highly edited videos of success already it’s good to see some failures. To remind everyone that success takes work and often wrong paths. At least that sounds better then I don’t enjoy video editing so I just post what I record with minimal changes/edits.
I also like to imagine people figuring out the problem long before I do and are yelling at the screen. Like yelling at protagonist in a horror movie. “The problem is right there! No don’t go that way! You looked directly at the problem! You are so dumb!”
Spoiler alert: I do figure out root cause. At least I think I do. We will find out in the next video. A coding cliff hanger!
Have question you want answered in a future video? A question I should ask you? Pair on a problem? Constructive feedback? Send an email to ask@saturdaymp.com.